Showing posts with label Preparedness. Show all posts

Saturday, March 4, 2017

How airsoft and skirmishes can teach you about being prepared for survival

Many airsoft BB gun users take part in organized skirmishes - aka fake battles and survival scenarios. A lot of people don’t believe in ‘playing’ with guns or allowing youngsters to play with guns or take part in skirmish activities as they believe it’s setting a bad example. However, using airsoft BB guns and taking part in skirmishes can teach you a lot about being prepared and surviving in any situation.

Honing your shooting skills

You may think that in real life you will never need to know how to shoot a target, but at one point or another, you may well need to be able to do so. Its one thing shooting targetsat a shooting range; it’s completely another shooting a moving target during a skirmish, which is why skirmishes are so useful when it comes to honing your shooting skills. When it comes to surviving in the wilderness, being able to shoot a moving target - ideally, at a distance away - is crucial. Proving that skirmishes are an ideal way to do this, many police forces and military forces use BB guns and skirmishes to help new recruits hone their shooting skills.  

Learning to work as part of a team

Another important lesson that skirmishes can teach you is working successfully as part of a team. If you’re someone who watches survival films or war films even, then you will know that when it comes to survival, teamwork is often crucial. Skirmishes teach you how to not only look after yourself but also your team members, as well as how to obey orders and do as you’re told. If you are put in a leading position, skirmishes also teach you how to lead a team and determine who does what role within it. When it comes to survival (and preparation), being a good delegate is important - this is a skill that leading a skirmish team will allow you to develop.

How to stay hidden

Just like in real wars, the key to surviving when under attack is being able to stay hidden. Taking part in skirmishes teaches you how to stay hidden by camouflaging yourself. It also teaches you how to pick the opportune moment to reveal yourself and how to determine when that is. Talking about careful thinking, it’s also crucial to learn to use ammunition wisely, which is another key thing that skirmishes teach you. You only have a certain amount of ammunition and have to learn to make it last, if you’re going to survive, that is.

Adapting to different environments

Last but not least, skirmishes teach you how to successfully adapt to play in different environments. Sometimes matches will be held outdoors in woodland areas other times they will be held in indoor areas like old malls. If you’re going to survive whatever is thrown at you, you need to know how to adapt to different environments and use your airsoft skills successfully in each of them. They say that practice makes perfect, so the more skirmishes in different environments you compete in, the better.

Airsoft BB guns and skirmishes can teach you a lot about being prepared and surviving anything, from a Zombie apocalypse to a terrorist takeover.

Staying above the water line!

Riverwalker


Saturday, January 14, 2017

6 Prepper Tips to Start Now

We’ve all made mistakes before, but some of us are still making mistakes that we don’t even realize we’re making. Our bug out bag is sitting in the corner and we think we’re ready to go if anything were to happen, but there’s really so much more you could be doing to be completely prepared. Here are 6 things to start doing now.

1.) Gather your team

You might decide that turning your back on mankind and trying to survive completely alone is the best idea, but there’s no way you can do it all on your own. Find those closest to you who you trust and want to survive and create a team. In the end of the world, having others on your side will make your load lighter and chances of survival higher. When you’ve assembled your team, figure out who is strong in what areas and assign tasks. If you don’t have someone who is skilled in a certain area you believe is vital, either find someone who is to join or have someone learn how to do it.

2.) Learn new skills

Even the most prepared survivalist doesn’t know everything they need to survive. Being skilled in all kinds of different areas will help you be even more prepared for the worst. Skills like hunting, defense, building shelter, and lifesaving techniques are important for every advanced prepper. Taking online courses like ACLS recertification and canning classes make learning new skills easy.

3.) Practice, Practice, Practice

When a disaster comes, you don’t want to be running around like a chicken with it’s head cut off. You want to be prepared for the worst, but how do you do that? Practice. Get your team together and start running through drills so everyone knows exactly what they need to do when the dreaded day comes. Practicing won’t only help teach everyone what is expected of them, but will help you figure out what areas still need to be prepped. You’ll hit roadblocks in your practice run that you can fix before a disaster hits and you’ll be that much more prepared.

4.) Take a breather

Take a minute to just think and relax. You don’t want to always be uptight and worrying about what could go wrong. Being mentally stable is a key to being a successful prepper. Not focusing on being prepared will help you get back to the basics and figure out what is really important to you. Once you get back to work, this will help you be refocused and know what areas need work.

 5.)Bug in

We all have our bug out plan, but what happens if we get trapped in or it isn’t safe to go outside? You need to be prepared to bug in, or stay in place and survive, and know when you should bug out or bug in. Certain emergencies will require you to bug out and certain ones will require you to bug in. Either way you should be prepared, but a lot of us only think about bugging out. We don’t have the necessary supplies or plans to stay in place. Create a plan for staying in place that includes security, shelter, communication, and how you will get food once your supply runs out. Keep a stash of food close by to be prepared to bug in. Here are some other tips for bugging in.

6.) Check your supplies

Things go bad and we don’t think about it. You don’t want to be stuck in a disaster zone when nothing works. Checking all your supplies periodically will avoid this disaster of it’s own. Make sure your car is still in good shape. Check your food storage occasionally to make sure everything hasn’t expired. The best tip I’ve heard when checking your supplies is check it all yourself. You can’t just assume they will work when you need them and someone else might not like some of your supplies. If you check everything, you’ll know it works and you’ll know if it works for you.


We all make mistakes when we’re prepping for a disaster, but there are some we can easily avoid. If you start implementing the above tips, the day the world ends will go a lot smoother for you and your family. 

Staying above the water line!

Riverwalker

Monday, November 7, 2016

The 12 Essentials of Any Bug-out Bag

There’s a new trend emerging, but it’s not one that’ll have you visiting clothing stores. Natural calamities are hitting places all over the world – occurring at a rate never seen before. The chances of you being next are at the highest they’ve ever been, and you best prepare. For this, you have the bug-out bag.
Bug-out bags should contain everything you need for at least 72 hours of evacuation from a disaster site. Keep that in mind when you go over the following list of essentials found in every bug-out bag.

1. Water

Ah, the stuff of life. Science says you can last weeks without food, but can die from dehydration in a matter of days. Bring at least a liter for every day you expect to remain in evacuation per person. In that case, have a minimum of three liters per person ready. Store your water in sturdy containers just to be safe, too. If in case it turns out you hadn’t brought enough water, having water purification tablets ready should do the trick.

2. Food

Canned goods and dehydrated meals in plastic containers and paper bags are ideal over fresh food for a lot of reasons. For one, they require little to no preparation – something you probably won’t have the resources for in an evacuation site. They also have a prolonged shelf life (or, in this case, bag life), which you’ll need when you can’t access refrigeration. To add, the cans could also be used for other purposes throughout your evacuation. Prepare some food preparation instruments like a knife, although that could easily be substituted by the more useful Swiss knife.

3. First Aid

Accidents can happen at any time, and even more so when disaster strikes. Your bug-out bag should contain basic first aid, including bandages, povidone iodine, adhesives, tweezers,vitamin tablets and your prescription medicines. Also consider putting in some antibiotics like cephalexin, ciprofloxacin and metronidazole. These handle all kinds of nasty infections you’ll be prone to in an evacuation.Your bug-out bag should also have some benadryl in case of allergies. Not everyone may have these ready, so be open to sharing your aid with strangers. Who knows? You may even find yourself on the receiving end.

4. Zip ties

Zip ties already have so many functions in regular, everyday life, yet they prove even more useful for evacuation purposes. These can be used to restrain objects in cases of strong winds, restrain people in times of danger or panic, hold together different materials to keep warm or expand your shelter, serve as a temporary tourniquet when a proper one can’t be made – the list goes on.

5. Personal hygiene materials

Getting struck by disaster is no excuse to let yourself go. Have the basics like tissue, soap, a toothbrush, and toothpaste. Bringing a razor serves both purposes of grooming and self-defense.

6. Self-defense

Should supplies become scarce or you encounter any danger (let’s hope not), you’ll be glad you packed something to protect you and your loved ones with. Rifles are good for hunting too in case food runs short.A .22 caliber rifle seems to be the rifle of choice in this case.

7. Alternative power supply

When you’re bugging out, chances are there won’t be a readily available power supply. It’s a good thing technology has alternative, renewable solutions for generating electricity. Get yourself a crank power charger or even one that runs on solar power. The latter would, obviously, not be ideal in a hurricane situation. More specifically, there are also emergency radios available that run on crank power. 

8. Fire-starter items

At home, you cook, warm up, and need light. Evacuation is no different as these are essentials. There is, after all, a reason the discovery of fire propelled human evolution. Pack some waterproof matches, lighters, maybe even a can of butane. That last one will be especially helpful in the case of a zombie apocalypse as it makes a good makeshift fire bomb.

9. Light source

Again, no power means no light, and that becomes an especially pronounced problem come night time. A torch with a hand crank is ideal, but isn’t always available. Battery-powered should do just fine, but remember to pack extra batteries in that case. There are also some solar-powered lamps available in the market. Most of these things can be found in the camping section or appliance section of most department stores.

10. Clothes

Don’t bring your whole wardrobe. Remember that a bug out bag is ideally good for only three days. Go for smaller, lighter garments like your average t-shirts, shorts, and the like. Extra underwear and socks are good, too. Should these run out, you could rinse them out at a nearby water supply, but let’s not hope it gets to that. And, make sure the water used for laundry isn’t meant for drinking. Come on.

11. Shelter

Other than having shelter for the sake of shelter, this also provides safety for you, your loved ones and your belongings. You’ll also need to be well-rested to stay alert – of utter importance in times of calamity. There are several compact tent variants for you to choose from. Also make sure you have on you some tarp and ground pads.

12. Survival manual

There are some thing you just can’t be too prepared for, and being prepared entails covering every possible scenario. Survival manuals will provide the necessary know-how for sticky situations and should your evacuation level up to a survival scenario.

The rule of thumb in packing your bug-out bag is to expect for the best while preparing for the worst. You know your area and its people better than any website, and should use that knowledge in stocking up. Should disaster strike, you’ll find these items to be more than useful for your evacuation.


Staying above the water line!

Riverwalker

Wednesday, December 17, 2014

Mobility and Survival

Survival can be an impossible goal if we place undue burdens on our physical abilities. This is often exemplified by our attempts to carry every possible item of survival gear we own. The result is that we have created a scenario that will make the goal of survival more difficult to achieve. The old saying “Know more. Carry less.” is a good reminder that will help you avoid this problem. Mobility is directly related to your survival.

Mobility is a key factor in many survival situations. It allows you to remove yourself from dangerous and life threatening situations. It allows you to search for needed shelter, food or water. The inability to move can be the start of a process that will ultimately eliminate any chances you may have had for survival.

Our bodies are remarkable things and we often push ourselves to extreme limits even before we become engaged in a survival situation. This is a dangerous approach that should be avoided and physical limitations must be dealt with prior to finding ourselves in a survival situation.

One of the most difficult things to deal with in a survival situation is an injury. It will slow you down or completely stop you in your tracks. Your chances of survival have almost been completely eliminated. There are numerous examples of things that can be avoided to safeguard against this problem.

A prime example of this is the bug out bag. Carrying a heavy pack can lead to knee or back problems that are a creation of our own making. Military personnel have had to deal with this situation throughout history and many a battlefield was littered with abandoned gear when their survival was at stake. Make sure you cut your body some slack and carry a pack that doesn’t push the limits of your physical abilities before its necessary. While a trained soldier may be able to carry 100 pounds of equipment, it could be a deadly burden for someone without the proper physical ability and training. Know more. Carry less.

Another example of dangers to your mobility is caused by the failure to treat simple injuries. A cut on your hand or foot can cause a host of additional problems you won’t need. Take the time to handle cuts, sprains, blisters and other minor injuries as quickly as possible.

You can also adversely affect your mobility by being improperly dressed. A good pair of shoes or boots is of utmost importance. Many people have a hard time walking even a short distance in their bare feet. Imagine what the effects on your mobility would be if you found yourself with bare feet. The same goes for items such as gloves to protect your hands and a good pair of pants to protect your legs. Don’t forget to include a decent shirt and some sort of jacket appropriate for your weather conditions.

Lee Mastroianni of the Office of Naval Research summed it up very appropriately:

“The ability to move is directly related to the ability to survive.”


Staying above the water line!

Riverwalker


Friday, December 12, 2014

Dreaming of a Green Holiday Season

It pays to be prepared for Christmas. Most people have a certain set of rituals for the holidays. This usually includes buying and wrapping gifts, decorating and buying a Christmas tree. These are time honored traditions, and they’re fun, but they can also be hard on the environment. Fortunately, there are many fun ways to celebrate a “Green Christmas” — one that is both environmentally friendly and joyful. Let’s look at some of the best ways to prepare for a green holiday season.

Send Emails Rather Than Paper Cards
While Christmas cards are a tradition, they also waste quite a bit of paper between the card and envelope. Emails are not only more environmentally friendly, they save you postage. You can get creative in your emails and include nice holiday themed graphics or links to e-cards.

Gift Wrap Using Recycled Paper
You can either buy recycled gift wrapping paper or repurpose paper you already have. You can make your gift wrapping even greener by also using recycled bows, ribbons and other decorative items. Another option is to wrap gifts in decorative gift bags that can be reused.

Use a Live Christmas Tree
It may come as a surprise to some, but live Christmas trees are better for the environment than plastic ones. Plastic consumes many resources and creates quite a bit of waste and pollution. The most sustainable type of tree is a live one in a pot. You can either keep the tree in its pot or replant it after the Christmas season.

Use LED Lights on the Tree
When lighting up your Christmas tree, use LED lights, which are far more energy efficient than other kinds. LED lights can last as long as 100,000 hours, which will get you through many holiday seasons! You should also remember to turn the lights off while everyone is asleep. Christmas tree lights, even LEDs, can actually hike up your monthly energy bill in December, so this might also be a good time of year to look into whether or not you can reduce your monthly energy costs by changing service providers (see this website for more details).

Give Creative Gifts
There are many alternatives to buying gifts at the mall or ordering them online. You could make gifts for people. If you are artistic you could create paintings, sculptures or collages for people. If you are handy, you could make items out of wood, metal or other materials. If you are good at sewing or needlepoint, clothing, rugs or blankets all make great gifts. Another option is to give experiences rather than physical objects. This might include yoga classes, massages, spa treatments or gift certificates for a nice restaurant.

Buy “Green” Gifts
There are now many companies that make eco-friendly gifts, whether clothing, jewelry, toys or home decor. You can also find creative and green gifts at antique shops. Most of all, try to avoid toys and gadgets that require batteries, which are an environmental hazard when discarded.

Reduce Holiday Driving
It’s easy to get into the habit of driving everywhere during the holiday season. Between shopping, holiday parties and visits, people often consume extra fuel during this time of year. Try to minimize this by doing more carpooling. If you have friends, co-workers or family members attending the same events, arrange to go together.

Buy in Bulk
It’s typical for people to stock up on food for holiday parties and meals. When you go to the store, buy as many items in bulk as you can. This includes not only food but also paper items such as paper towels and napkins. This will save you money and cut down on the packaging used.

These are just a few of the ways that you can have a “Green Christmas” this year. When you start thinking this way, you will probably come up with more ideas of your own. It’s often more fun to have environmentally friendly holidays, as you have to think creatively rather than simply do everything the same old way.

Thanks to Beth for a great guest post.

Staying above the water line!


Riverwalker
Wednesday, September 17, 2014

DIY RV Project - Exterior Utilities Hook-up Light


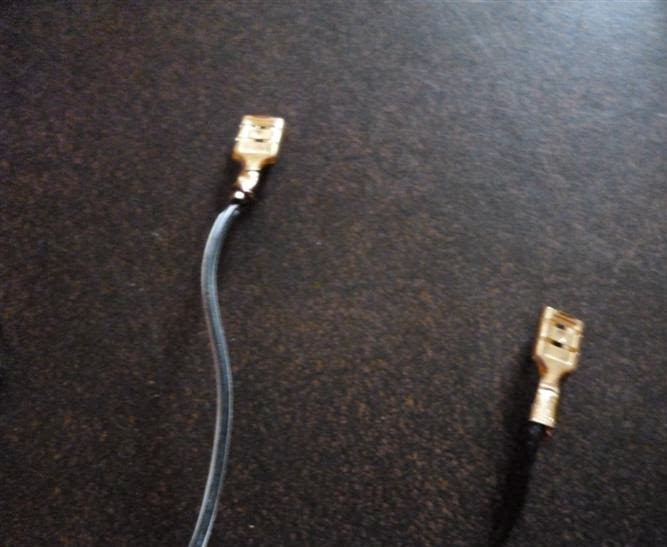
Many times you will find yourself trying to hook up the utilities to your RV at dark thirty. Installing an exterior light on your RV will make the task a lot simpler. It doesn’t matter if you are boondocking or hooking up to a park space. You may find yourself in the dark and fumbling around with a flashlight. An exterior light will leave your hands free to make the process of getting things hooked up a lot easier.

Using a $10 light from the local tractor supply outlet and about 8 feet of two strand 12 volt wire is all you need to accomplish this RV mod. The cover for the power cord was removed and a wire was run from the 12 volt connections inside the RV.  A small hole was then made in the side of the RV for the wire after a suitable location for the light was determined. A piece of coat hanger wire was then snaked behind the siding of the RV until it came out at the side of the electrical cord cover opening. The wire was then hooked to the 12 volt electrical wire and pulled through the hole. It was then a simple process of hooking the wires to the light and mounting the base plate to the side of the RV and installing the light cover.


The light included an on/off switch and the cover was mounted with the switch in the down position. Even though the switch was water resistant, mounting it where it was on the bottom helps avoid rain hitting it directly.

It’s a quick and simple RV mod that can be done in less than an hour.

Got RV mod?

Staying above the water line!


Riverwalker

Tuesday, September 16, 2014

Solar Garage Project


Pole-mounted Solar Panels

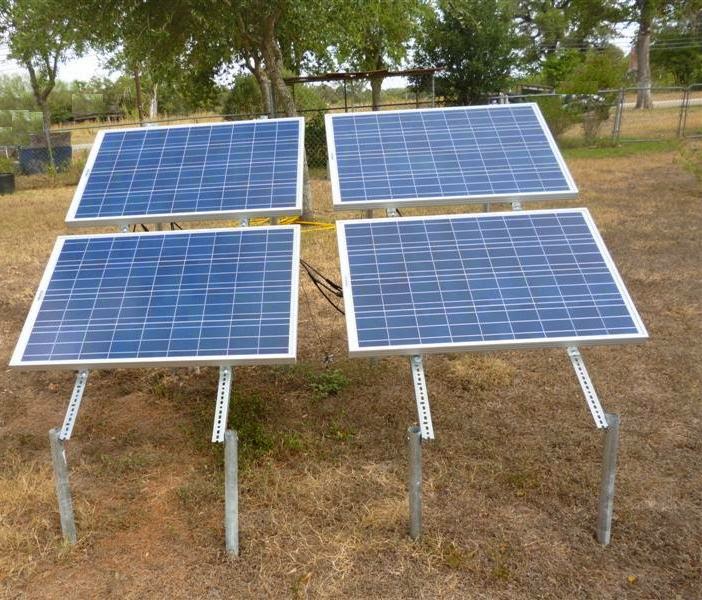
The conversion of my garage to solar power is completed and hopefully it will lower my utility bill. It took a while to get everything set up and working. My panels were pole mounted in order to make it easier to service the solar panels.


A total of four 100 watt solar panels were used to charge a battery bank of four 100 amp hour batteries. Two inverters were used to furnish power. A 100 watt pure sine wave inverter was used for lights and to power a small air compressor. An 1800 watt pure sine wave inverter was set up to furnish power for my power saws. This covers the majority of my power usage in the garage. I’ll also being running a fairly low wattage heat lamp for the chickens in the winter.


A solar panel kit from Grape Solar was used for this project and came with most of the necessary wiring, a charge controller and an inverter. There is additional information posted in my product review. A separate grounding rod was installed on the panels and the solar disconnect that was installed.

My grid-powered outlets are still functional and can be used if my solar power system goes down for some reason but won’t be used unless absolutely necessary. With the completion of this project, my storage shed, greenhouse and garage are now on solar power.

Part Two will show my battery bank, solar disconnect and charge controller set-up.

Got solar-powered garage?

Staying above the water line!

Riverwalker

Monday, June 30, 2014

Stay Safe from Summer Storms with These DIY Home Projects

Every day, hundreds of lightning bolts crash down from the heavens onto the earth below. For the Scandinavians, just as thunder was the embodiment of Thor, lightning was the embodiment of the hammer he used to protect humans from the ever-present threat of giants. These days, there may be fewer giants in the woods, but menacing electrical storms can still wreak havoc on your property. Luckily there are many small things you can do around your home to prepare it for the worst.

1. Remove Debris: Broken branches, building materials, lawn furniture, or other loose items around your home have the potential to become dangerous projectiles in the midst of a storm. Take time to assess your backyard and complete any tree removal or limb-trimming you feel is necessary.

2. H2O to Go: If a severe electrical storm is in the forecast, your power grid and city water system might both be at risk of going down. Fill up buckets, bottles, and even your bathtub for washing and drinking. Ice bags in the freezer can also help- a couple days without power may cost you a couple hundred bucks in rotten food. Fill freezer bags with water and keep them in the freezer, then use them in the event of a blackout to help food stay cold longer. When they thaw out, you’ve got clean drinking water. Before the storm, you can also make a rainwater collection system for very little money and store hundreds of gallons of water to use for your garden, plumbing, or other uses.

3. Repair Your Roof: In order to prevent leaks and severe damage to your roof during a downpour, you should carefully inspect your roof gutters and shingles. Doing minor repairs early on is much better than cleaning up the after-effects of indoor flooding. Start by examining chimneys, skylights, and plumbing vents for moisture. Look for algae stains on interior plywood, wet insulation, or rust around nails, since these are some telltale signs of leaks.

4. Solar Sump Pump: For remote areas needing pumping without access to power, a sump pump with solar batteries can provide the answer. Install a couple of small solar panels to charge the portable water pump’s batteries, and you can go “off the grid” with your portable pump. Some people live in areas where storms may leave them without access to a working electrical grid for weeks or even months; in these cases, it can be very useful to have a battery backup to keep solar electricity in reserve for nights and cloudy days. Solar energy is catching on among many in the United States, and in Canada you can even find alternative eco-friendly energy plans through various informational websites that can let consumers bypass main fossil-fuel based providers altogether.

5. Fill Your Gas Tank: Keep a full propane tank handy so that you and your family can still enjoy a hot meal if you have a gas grill and meat in the freezer. In times of lengthy outages, you can always grill the contents of your fridge before the food spoils. Filling your car with gas before a storm allows you to turn it into an additional survival tool. Cars can be used to charge cell phones, provide heat, and even function as a generator with a power inverter. Your car is also your means of emergency transport and without power, gas stations in your area will be unable to help you refill your tank.

Each storm is unique, and presents its own unique set of challenges, but having some survival tips in mind can help put the odds in your favor. With all the time and money you’ve invested into your property, being prepared is just plain common sense.

Beth Kelly is a freelance blogger from the Midwest and the author of this guest post.

Thanks go out to Beth for some great tips.

Staying above the water line!


Riverwalker

Friday, May 16, 2014

DIY Solar Project - Portable Water Pump - Part One - Basic Planning


The practical application of your knowledge should be the goal of any DIY project you may decide to undertake. A DIY project can be a simple solution to a major problem. If you just give it some careful thought and a little basic planning, you can find a solution that will solve the problem.

 Mrs. RW had a big problem in getting water from our rain barrels to her plants. With numerous rain barrels (and plants) in different places and spread out over a couple of acres, Mrs. RW needed some way to get the rain water that was collected to her plants without having to pack a jug or bucket. The solution was fairly simple. A portable water pump was needed to move the rainwater to the plants.

Building a DIY Portable Water Pump - Basic Planning


1. Choosing a Portable Platform

A decision was made to use a Stanley Mobile Work Center for the platform to build a portable water pump. It was fairly inexpensive and cheap enough to scrap the whole thing if the project went south. This is the case in many instances in my DIY projects and more often than you might think. It also offered a large storage bin that would be ideal to house a battery that would be needed to run the pump and it also had a folding handle that would also work great for this DIY project. The top toolbox also offered a decent amount of storage. Although the sliding door to the bin sometimes comes off its track, the door is easy enough to put back on its track. It has wheels and a fairly strong axle to accommodate the weight of any items stored in the bin and the tool box. The next step is choosing a power source.


2. Choosing a Portable Power Source

Any portable water pump is going to need a power source and grid plugs and gasoline aren’t always available. Consider that a good grid-powered water pump can cost upwards of $150 and one powered by a two or four cycle engine can cost several hundred dollars or more. This made the decision to use 12 volt power easy. The problem would be keeping the battery or batteries charged. Since the pump’s primary use would be in the daytime, a little solar action would take care of keeping the batteries charged.

Several battery options were considered. When a large deep cycle battery (24 series) wouldn’t fit and was way too heavy for the toolbox, a smaller and lighter battery option was needed. Four 6 volt / 13 Amp Hour AGM (absorbed glass mat) batteries were purchased on special for less than $60. This solved the problem as far as powering the portable pump. Using a couple of 12 volt (2.5 watt) solar panels that were purchased for less than $10 each would solve the problem of keeping the batteries charged. A solar charge controller would also be needed to protect the batteries from being overcharged and to regulate the load that would be placed on the batteries.


3. Choosing a Portable Water Pump

Several features were going to be needed for our portable water pump to get the maximum use and benefit out of a portable system. A 12 volt water pump with a flow rate of 1.2 GPH (gallons per hour) with a pressure of 35 PSI was decided as the best option. The pump would also need to be lightweight and with a very minimal current draw to prevent exceeding battery capacity. It also needed to be cost effective and allow for the maximum size possible for our toolbox platform.

Suction and discharge hoses can also take up a lot of space and greatly increase the weight factor. The size of the discharge and suction ports on the water pump should be a major factor when choosing a pump. The pump in this case had 3/8 inch ports which were suitable for this application.


4. Choosing Accessories

There are also additional accessories that may be needed in order to minimize any problems with your portable water pump. Some are required for safe and efficient operation. Others are optional and can be used or not used depending upon personal preferences. Fuses, switches, disconnects and battery monitors are just some of the items that are required for a safely functioning system.

With a platform, water pump, power source and the accessories chosen, the only thing left was to put all the pieces together and hopefully end up with what should be an extremely versatile and useful piece of equipment.


In Part Two, the actual details of building the portable water pump will be outlined. The manner in which problems were handled and the solutions that were chosen to deal with the problems encountered during the build process will also be covered.

Got pumping power?

Staying above the water pumping line!
                                                                                       

Riverwalker

Monday, May 12, 2014

New Solar Project


New Solar Project

I have a new DIY project in the works. When it's completed, I'll be posting an update on the project. Waiting on a few miscellaneous parts to complete the final assembly.

Got DIY project?

Staying above the water line!

Riverwalker

Friday, April 25, 2014

DIY Solar Shed Project


Solar Panels

With my new storage shed finally completed, it was time to power it up.  Conventional electrical power was going to be quite expensive to run electrical to my new shed because it wasn't very close to any existing conventional electrical power. Without any inside wiring, it was going to cost between three and five hundred dollars for a grid hook-up and I chose going the solar route as a cheaper alternative.

In the picture above are three 10 watt solar panels that were purchased on a close-out special for $29 each. Total cost of the solar panels was $87 plus tax. The panels also came with several additional cables that were cannibalized to wire up my system.


The above pictures show the mounting that was fabricated for the solar panels. The posts are standard chain link line posts (5 1/2 foot). The mounting frame was made from two pieces of one inch aluminum square tubing and two pieces of one inch aluminum angle brackets. All pieces were four foot in length.  The total cost for this was slightly less than $40 but did require some time and effort to put together. A Battery Tender 25' Quick Disconnect Extension Cable  was used to feed the solar panel output into the shed. The cost of the additional extension cable was about $13. A NOCO ISCC2 5-Way SAE Adapter Connector at a cost of about $5 was used to connect the solar panels together. 
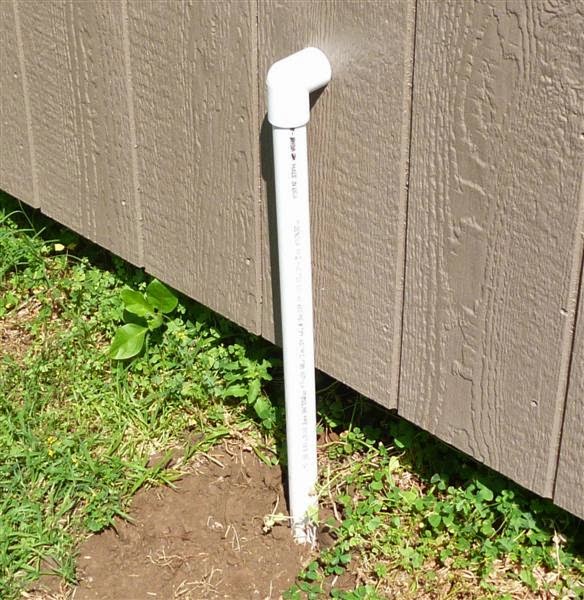

This is the underground pipe that feeds the extension cable into the shed. The cost of pipe and fittings was less than $20. The solar panels were only about ten feet from the rear of the shed. They were mounted to keep shade from the roof blocking the solar panels and to avoid rain  from the roof falling directly onto the solar panels.


The above picture shows the charge controller in operation. An HQRP 20A Solar Panel Battery Charge Controller  was chosen because the primary function of this system was to supply light to my shed and this charge controller works well for this purpose. The cost of the controller was slightly less than $30.


The above picture shows the in-line fuse of my connection to the battery from my controller. This is a Battery Tender Ring Terminal Harness with Black Fused 2-Pin Quick Disconnect Plug that connects directly to the solar charge controller. The positive cable in the picture runs to a small 400 watt inverter.


This picture shows my 100 amp battery ( Walmart brand ... $75) and my 400 watt inverter. The inverter is going to be used to power a small fan when working in the shed. The cost of the inverter was $25. It's big enough for it's planned use but a bigger inverter may be added later as money permits.


This is the Cobra 400-Watt 12-Volt DC to 120-Volt AC Power Inverter  that is being used in my system. I used larger cables than came with the unit to lessen current loss and avoid over-heating from using cables that I felt are too small to handle even the light loads that may be placed on this unit. My plans are to not exceed 50% of capacity as a safety precaution and to prevent damaging the inverter. It includes a USB charging port.


This is the charge controller during a load test. In the picture, you can see where the SAE connector to the solar panel input has been disconnected. This triggers the sensor on the charge controller which then opens current to the load connections. This causes the LED light  to turn on.


This is a SainSonic CMP12-10A Solar Charge Panel battery Controller Regulator 10A 12V/24V Auto Switcher spare controller that was purchased as a back-up unit. Just in case!

Any solar power system should be designed for your needs and in such a manner that you don't place unnecessary strain on your equipment. This will insure that it is capable of meeting your requirements. With a little time and effort and slightly more than $250, this system satisfies my needs and should give me good service for an extended period of time. It also doesn't add to the cost of my grid service.

Special thanks go to RW, Jr. who built the shelf that was used hold all the equipment (battery, inverter, charge controller, etc.) and for digging the post holes. 

Got solar?

Staying above the water line!

Riverwalker

Tuesday, April 22, 2014

5 Easy Tips for starting an effective food storage


If you needed to live off of the items in your home for an undetermined amount of time, would you be ready?  No matter where you live, your home is susceptible to natural disasters and emergency situations. Creating an effective food storage is important for everyone, no matter their household size or living situation. Because starting your food storage may be a bit overwhelming at first, we’re here to help you take care of this important detail in emergency preparation. Check out these five easy tips then start building your food storage today!

1.       Take your time :

While it may feel like you should be getting this done ASAP, it’s important that you take your time to get it right. Add a few items to your supply each week until you have three months of food stored away for you and your family. It takes time to stock up on a whole year’s supply of food. Learn to use your freezer and make extra portions of your favorite foods to bag and freeze them.

2.       Planning:

You don’t have to go broke buying supplies for your food storage. Start with a food storage plan and add a little at a time. Use a checklist to ensure that you’ve purchased foods that you will actually eat. This will help you stick to a budget as you add to your food storage over time.

3.       Find Storage space:

One of the major obstacles you will encounter is finding enough space for your emergency preparedness supplies. Preparing space in advance will help you find areas for storage. Don’t panic if you have a restricted amount of space to work with. It’s fun to get creative when looking for storage space ideas. The most common places that are overlooked are under beds, in closets, under dressers, under desks, and under or behind sofas. You can also go through your household items and toss duplicate or seldom-used items.

4.       Create a Rotation:

Occasionally, you will have to go through your emergency food supply to replace older items. You will want to do this once a year or even every two years. It is important to restock what you remove. Rotating your long term food storage is an awesome way to introduce your family to the flavors of your emergency supplies while keeping it refreshed.

5.       Keep track of your items:

Find a simple system for tracking what you have as well as what you need. Without a food storage inventory, you could end up with too much or too little of food.

Guest post by: Augason Farms 
                                                                 
About Augason Farms:

For more than 40 years, Augason Farms has provided quality a la carte and bulk food storage items to home and business owners throughout the U.S. Our high quality kits and a-la-carte items provide our customers with easy and affordable solutions for starting an emergency food storage supply.


Staying above the water line!

Riverwalker 

Thursday, March 13, 2014

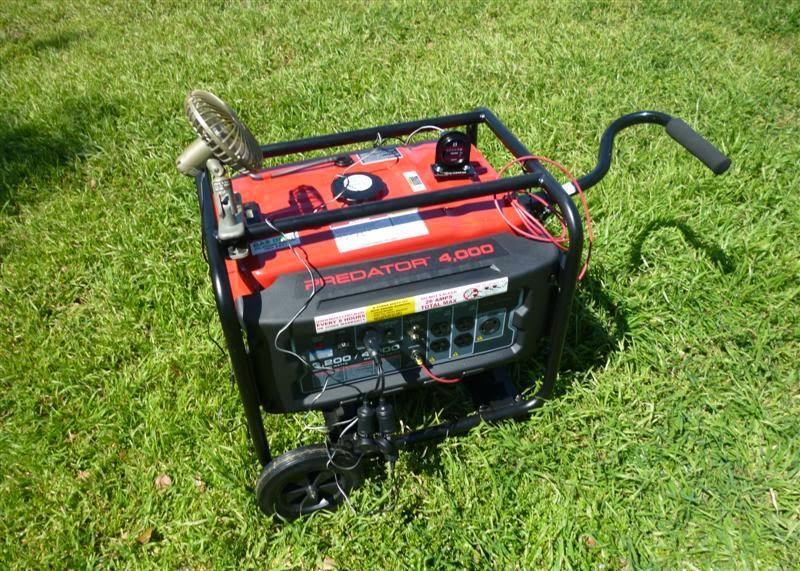
Predator 4000 Generator - Update #2 - Hour Meter Installation and 12 Volt Test


If you make changes to a piece of equipment that is still under warranty, you risk voiding the warranty even though the changes you made weren't the cause. Unfortunately, all the “bells and whistles” aren’t included on most equipment and there are times when the simple addition to a piece of equipment will insure it functions properly.

Many generators don’t come with an hour meter. Hour meters are great for keeping track of run times on equipment and to help you keep track of service intervals for your equipment. This will help you get the maximum life out of your equipment. Adding an hour meter in the wrong way by altering the equipment (like drilling holes for a gauge) can effectively negate your warranty. Companies don’t like you altering their equipment, even if it serves a worthwhile cause.


Most generators include a 12 volt outlet on their control panel. Using a 12 volt plug-in adapter and a fairly strong magnet, you can easily hook-up an hour meter to your generator without making any modifications to your generator. This works on other types of equipment also. You can also use double sided self-adhesive tape or plastic zip ties. Use whatever is handy and avoid making any permanent modifications to your generator to avoid loss of your warranty.


To accomplish this you will need a DC hour meter, a 12 volt male plug-in adapter, a short piece of wire( two strands), a single gauge mounting panel ( 2 inch in this case) and a flat magnet (an old key holder works great!). You will also need a pair of pliers (needle nose pliers work best), a knife to strip the insulation from the wires and some electrical tape. I also used a small drill to make two holes to mount the gauge holder to the magnet case. Hook the connectors (included with the hour meter) to one end of your two strand wire and the 12 volt male plug-in adapter to the other end of your wire. I used a male plug from an old 12 volt air compressor that had died and was sitting in the garage for a couple of years. Knew it would come in handy for something.


If possible, try to find a double wire that has a black with white stripe and a plain black wire. The wire with the white stripe should be used for the positive connections (+). This keeps the polarity correct and in accordance with current 12 volt wiring standards.


You might want to use a double outlet plug-in that will allow you to use your 12 volt connection to power items other than your hour meter. In this case I used the additional outlet to power a two speed 12 volt fan that can be used to provide additional cooling to the engine on hot days or if it is in an enclosed space (generator box).


Prior to installing on my generator, I plugged the finished assembly into the power outlet on my truck until 2.4 hours had been registered to update the meter reading to include the hours run on the generator at this time. After final testing, the meter read 2.6 hours which indicated a total test time of about 15 minutes. Total cost for this non-invasive hour meter installation is about $35 and can be done for less if you scrounge a few old parts.

This completed my final test on the generator and everything worked as expected. The only item left is an oil change since the initial engine break-in period has been completed.

Got hour meter?

Staying above the water line!


Riverwalker
Related Posts with Thumbnails