

Solar Panels
With my new storage shed finally completed, it was time to power it up. Conventional electrical power was going to be quite expensive to run electrical to my new shed because it wasn't very close to any existing conventional electrical power. Without any inside wiring, it was going to cost between three and five hundred dollars for a grid hook-up and I chose going the solar route as a cheaper alternative.
In the picture above are three 10 watt solar panels that were purchased on a close-out special for $29 each. Total cost of the solar panels was $87 plus tax. The panels also came with several additional cables that were cannibalized to wire up my system.


The above pictures show the mounting that was fabricated for the solar panels. The posts are standard chain link line posts (5 1/2 foot). The mounting frame was made from two pieces of one inch aluminum square tubing and two pieces of one inch aluminum angle brackets. All pieces were four foot in length. The total cost for this was slightly less than $40 but did require some time and effort to put together. A Battery Tender 25' Quick Disconnect Extension Cable was used to feed the solar panel output into the shed. The cost of the additional extension cable was about $13. A NOCO ISCC2 5-Way SAE Adapter Connector
 at a cost of about $5 was used to connect the solar panels together.
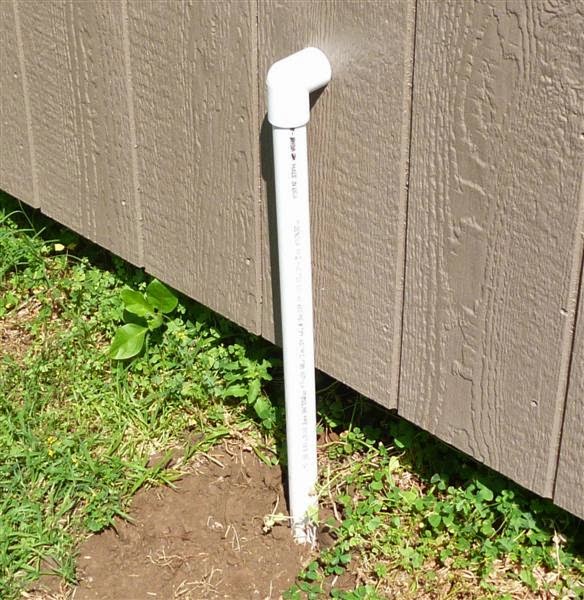
This is the underground pipe that feeds the extension cable into the shed. The cost of pipe and fittings was less than $20. The solar panels were only about ten feet from the rear of the shed. They were mounted to keep shade from the roof blocking the solar panels and to avoid rain from the roof falling directly onto the solar panels.

The above picture shows the charge controller in operation. An HQRP 20A Solar Panel Battery Charge Controller was chosen because the primary function of this system was to supply light to my shed and this charge controller works well for this purpose. The cost of the controller was slightly less than $30.


This picture shows my 100 amp battery ( Walmart brand ... $75) and my 400 watt inverter. The inverter is going to be used to power a small fan when working in the shed. The cost of the inverter was $25. It's big enough for it's planned use but a bigger inverter may be added later as money permits.

This is the Cobra 400-Watt 12-Volt DC to 120-Volt AC Power Inverter that is being used in my system. I used larger cables than came with the unit to lessen current loss and avoid over-heating from using cables that I felt are too small to handle even the light loads that may be placed on this unit. My plans are to not exceed 50% of capacity as a safety precaution and to prevent damaging the inverter. It includes a USB charging port.

This is the charge controller during a load test. In the picture, you can see where the SAE connector to the solar panel input has been disconnected. This triggers the sensor on the charge controller which then opens current to the load connections. This causes the LED light to turn on.

This is a SainSonic CMP12-10A Solar Charge Panel battery Controller Regulator 10A 12V/24V Auto Switcher spare controller that was purchased as a back-up unit. Just in case!
Any solar power system should be designed for your needs and in such a manner that you don't place unnecessary strain on your equipment. This will insure that it is capable of meeting your requirements. With a little time and effort and slightly more than $250, this system satisfies my needs and should give me good service for an extended period of time. It also doesn't add to the cost of my grid service.
Special thanks go to RW, Jr. who built the shelf that was used hold all the equipment (battery, inverter, charge controller, etc.) and for digging the post holes.
Got solar?
Staying above the water line!
Riverwalker


4 comments:
The sensor on the charge controller which then opens current to the load connections.solar charge controlleris an important part of the solar system that is responsible for regulating the solar batteries.
Failure to successfully implementing DIY Solar projects is quite a common reason why Pakistan is lacking behind in the field of solar energy.
DIY solar projects are quite old and difficult to install now. There are several solar companies that are providing solar solutions for homes and businesses.
Although, there are myriad solar companies in Pakistan, but Reon Energy is a well-known name. It has installed large-scale projects in Pakistan. There are several solar companies that are providing solar solutions for homes and businesses.
Post a Comment