Showing posts with label Tool Tips. Show all posts

Monday, June 17, 2013

Urban Survival Tools - Part One


Urban Survival Tool

Many times the tools shown being used for survival deal with rural or wilderness settings. The truth of the matter is that far more of us will be dealing with survival in an urban setting. The vast majority of people don't live in remote wilderness areas but instead must deal with the problems of surviving in an urban environment. If things go bad or take a turn for the worse, you may wish you had a different set of tools to get the job done.

In my next series of posts, we will take a look at the various kinds and types of tools you may need for urban survival. Even the simplest of tools can make an extreme difference when viewed from the perspective of an urban environment. There are many unique challenges to surviving in an urban setting. Hopefully you will have the right tools when needed.

In Part Two, we will do a real "world test" of  the Smith & Wesson Extraction & Evasion Tool.

Got urban survival tools?

Staying above the water line!

Riverwalker

Wednesday, October 13, 2010

The Pocket Axe - Gear Test Update

The Pocket Axe

Testing your gear in non-critical situations should always be a priority. New gear may look nice but the true test comes in how it performs when needed. Gear that breaks or fails to perform the needed task can be virtually useless in a survival situation. Here's the simple test done on my pocket axe.


Chopping Small Limb

Mrs. RW had decided to trim some limbs from a few of the trees in our yard and I figured this would be a good time to check out the chopping abilities of my pocket axe. Being small and lightweight is a good thing. I needed to see if it would chop wood when needed. The first thing I did was to chop a small limb that was approximately one inch in diameter. This took less than two minutes and was probably more like a minute and a half. The first thing that happened was the cord wrap was too loose and slipped upwards on the handle. This affected my grip somewhat but was manageable. You can see a slight gap in the cord in the above picture. There was plenty of additional cord hanging loose and a quick re-wrap with the extra cord and a little tightening up of the cord wraps helped the grip a lot.


Limb Measurement

This picture shows the diameter of the first small limb that was chopped with my pocket axe.


Chopping Bigger Limb

After adjusting the cord on the handle to get a better grip, I then proceeded to cut a larger limb of about 2 inches in diameter. This only took a couple minutes and tightening the cord on the handle solved the slippage problems when cutting the first limb. You can see the shortened length of cord in the above picture. When it came to chopping small limbs, it did an excellent job and the scuff marks left on the finish cleaned off easily with a little soap and water. It's important to keep your gear clean and ready for use.


Bushcraft Hammer

The next step was to test its wood-splitting abilities and I could think of nothing better than to use a bushcraft hammer (a.k.a. rock). The bushcraft hammer is a versatile tool and found easily most anywhere and anytime. You don't even have to carry one as part of your EDC gear because nature will provide one for you when needed. It will also let you know quickly if your gear will hold up. The main problems with this pocket axe is its short handle and lack of weight. It was hard to set the axe into the wood without a little assistance from the bushcraft hammer. Although, it easily split some 4 inch diameter chunks of oak that I had set aside for use in my smoker barrel, it did require a couple of taps with the bushcraft hammer to get it started. Once started, it then split the wood chunks easily. It was primarily a safety issue as I didn't trust the pocket axe to not slip and cause a possible injury when splitting the wood chunks.

Special Note: Use of a bushcraft hammer (a.k.a. rock) is not recommended for general use as it may cause gear failure.


Pocket Axe Kindling

It took less than five minutes to split a couple of chunks of oak into some decent kindling for a small fire (Native American style). If you're planning on building a bonfire (white man style), you'll need a lot bigger axe than this one. A decent amount of wood for a small fire could be still be split in a short amount of time. Its primary use is to be an easy to carry axe that would fit easily on my belt or in a small backpack allowing the ability to chop a little wood when making a fire. This small pocket axe will take care of that task. You will still need a larger axe for regular use in camp.


Finish Damage

Although there was no damage to the finish from chopping small limbs, there was some chipping of the finish that occurred when it was used to split some wood chunks. The above picture shows the chipped finish on the bevel that leads to the edge. Although disappointed by the damage, it didn't hurt its functionality and shouldn't be a problem as long as I keep it properly cleaned. The edge held up well with no apparent dulling even after splitting some oak chunks. Though the finish was marred somewhat, it still performed adequately.


Sheath Modifications

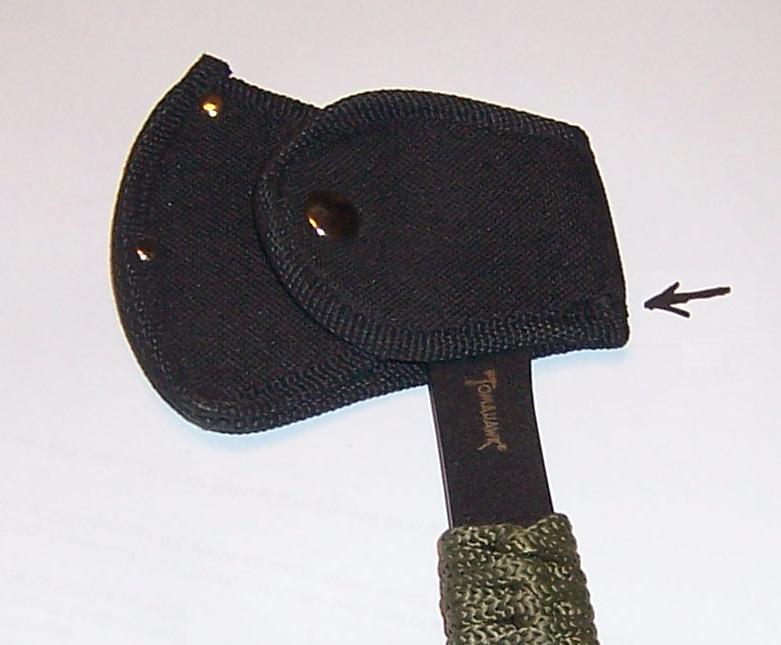
I wore the axe on my belt for several hours during the day. It was barely noticeable if my shirt was left out instead of tucked in. This is great for when you may need to use a "stealth" carry mode. With its light weight, I barely noticed it was there. Even when sitting, I was hard-pressed to notice its presence. There was a minor problem with the sheath in that it was fairly loose and the bottom of the axe had a tendency to slip out partially. Although it never slipped out completely, it did present the opportunity for loss of the axe. This was quickly fixed by Mrs. RW who put a small amount of stitching on the bottom side of the sheath to eliminate this problem (see arrow in pic above). This made the axe secure enough in its sheath to eliminate the possibility of losing it.

I had considered testing its ability to chop ice but this time of year there isn't much ice available in South Central Texas. The thought of using ice cubes from the refrigerator for a little testing had crossed my mind but a lack of ice cubes for her tea may have upset Mrs. RW and this idea was quickly abandoned.

Another option for improving this pocket axe is to see how hard it would be to customize it with a set of wooden or antler grips on it instead of the cord wrap. I'm also considering using this as a pattern to make a hand-made one out of a piece of carbon steel with some further additional modifications. These projects will have to wait for a later time.

Overall, I'm well satisfied that I now have a decent piece of lightweight and compact gear that should prove versatile and useful. If you're into ultra-light backpacking, a pocket axe is something you should consider adding to your gear. While this pocket axe won't replace your need for a regular camp axe, it would work well for a short day trip or hike from camp.


Staying above the water line!

Riverwalker


Tuesday, July 20, 2010

Polishing Your Blade

Keeping your knife cleaned and polished is an important part of properly caring for your blade. Like any good tool you should always find some time to perform the proper maintenance. Here’s an old trick for keeping that special blade cleaned and polished.

There are a lot of good products on the market that can help you do this but they can be expensive. If you are on a tight budget, one of the best ways to clean and polish your blade is to use wood ashes. Just place some wood ashes on a soft cloth or rag and polish away. Wood ashes will remove stains without scratching the blade. You can even use wood ashes on your blade instead of oils or waxes to keep the blade nice and shiny while you have it stored. Simply wrap it in a soft cloth after cleaning it with wood ashes and it’s ready to store. There’ll be no scratches on your blade and your knife can be simply wiped off when you need to use it.

Got a use for wood ashes?


Staying above the water line!

Riverwalker

Saturday, March 6, 2010

Frugal Prepping - DIY Repair Tips - Number One


Repairing things yourself is a great way to save money but it will also cost some of your time. Time which you would probably like to spend doing something else. With the cost of even a simple repair running into the three figure range nowadays, it can be a real disaster for your pocket book when something breaks or just simply gives out.

DIY Repair Tip - #1 - Plumbing Repair Tip

Here’s a simple plumbing repair tip that will help you if you need to fix a leaky faucet or drain pipe. Having the right tool for the job is an important part of any DIY repair. One of the handiest tools for a lot of plumbing repairs involving drain pipes is a good set of “channel lock” type pliers. These make it easy to tighten or undo drainpipes when you have a leak that needs fixing. When replacing a gasket or seal on a drain pipe, just coat the threads and gaskets with a little bowl wax (this is the ring of wax that toilets are mounted on…they are quite cheap and a single one will do a lot of repairs), this also makes it easier to undo later if need be and stops any annoying drips.

You can also use the bowl wax trick when hooking up drain pipes for an RV or trailer when temporarily at a location if you are using rigid pipe. I did this on my little 15 footer when I was working in the oil field (a lot of landowners required rigid connections for the trailers when workers were living on site). No glue needed, no wasted pipe and a rubber mallet undid the connections easily.

Got a DIY repair tip for your fellow preppers?

Staying above the water line!

Riverwalker

Wednesday, February 17, 2010

Survival Tools - The Compact Tool Kit

Mrs. RW's Tool Kit

You never know what kind of bargains you can find at garage and yard sales. Here's a $5 tool kit Mrs. RW got at a yard sale and it was in like new condition. She's pretty handy with tools when she's got them around. Since I'm usually dragging my tool boxes around in the back of my truck, Mrs. RW got herself a set of tools to keep around the house. This little tool kit is also very portable and can be thrown in her truck or the van when she's taking a trip. You just never know when you'll need to have some tools handy.

For the price it's hard to beat and if it can get you out of tight spot when something breaks it will be well worth the price. Although these probably aren't the best quality tools that are available, Mrs. RW says it sure beats using your fingers!

All she needs to do is to wrap it with some paracord and duct tape!

Got tools for the little lady?

Staying above the water line!

Riverwalker

Monday, January 11, 2010

Using Tools Safely

Using the proper tool, keeping it in good working condition, having the right tool and being aware of any hazards will help to prevent accidents and injuries. This will help you be more productive in your work without increasing the risk of an accident.

The productive and safe use of tools depends on being alert, having the proper knowledge regarding the use of your tools and making sure they are properly cared for and kept in good shape. Here are some general safety rules to observe when using hand tools.

1.) Check for hazards in the area before starting any type of work.

2.) Always use proper personal protective devices such as gloves and safety glasses.

3.) Always use the right tool for the job.

4.) Always check their condition before use. If damaged or in need of repair, use a different tool or complete any necessary repairs before use.

5.) Try to avoid transporting tools loose in a vehicle. Get a tool box and use it.

6.) Be careful when loading and unloading your tools.

7.) Never throw your tools. This can damage your tools or cause injuries to others who may be in the area.

8.) Have a designated area where you will be setting your tools when not in use to prevent accidentally losing tools. This could create a hazard later on and create additional expense due to the replacement costs of lost tools. Mark them in a way that will help them be more visible.

9.) Always mark tools that need repairs or that should be replaced if they become damaged.

10.) Always store your tools safely and out of the weather.

Using your tools safely will help you survive that repair without an accident or serious injury.


Staying above the water line!

Riverwalker

Saturday, July 18, 2009

Tools for Trade


One of the best and handiest items for trade or barter is tools. There is something about a tool that most men can't resist. Any kind of tool has the ability to become quite useful when something breaks or a repair is needed. Let's face reality. Sometimes your hands alone aren't enough and you are going to need some kind of tool to help you get the job done. A person without tools isn't going to get much accomplished. You need the knowledge and skills to make that emergency repair but it most likely won't be accomplished without some basic tools. Tools will always make good items for trade.

In the picture above are just a sample of some of the types of small hand tools that I acquired quite cheap at a yard sale. I recently purchased a dozen hand tools at a yard sale for only $3.00. That's only a quarter for each one. I even got two fairly good quality tools in the mix and have added them to my good tools. The others will go in my junk tool box.

I have my tool box for the farm which has some specialty tools that are necessary for some specialized type of work that is usually only needed at the farm. I have my truck tool boxes and even Mrs. RW has her own tool box for around the house repairs. I also have a junk tool box with an assortment of cheap tools that I've picked up for bargain prices at yard or garage sales. These are often real bargains and sometimes you even find a good quality tool in the mix. An old fishing tackle box or some cheap tool box will make a great place to keep some tools for trade. I've even traded a whole box of junk tools for some really good quality items. The good tool bargains are usually added to my good set of tools and the junk tools go in another old tool box. These I use to trade, sell or barter.

Got tools for trade?

Staying above the water line!

Riverwalker


Saturday, July 11, 2009

Simple Survival Tools - The Wood Cutting Combo


Many times during a storm or other natural disaster tree limbs can be knocked down by high winds causing serious problems. Your access to your home or vehicle may be limited by such an event. Having a few simple tools can help you get things back to a fairly normal state in just a short period of time.

A small pruning saw and a bow saw combined with a good pair of leather gloves to protect your hands will help you make short work of small and medium size tree limbs that may be blocking access to a door of your home or preventing you from getting to your vehicle. It may be a case of your drive-way being blocked by the limbs from a downed tree. These simple tools will make short work of any smaller or medium-sized tree limbs in your way.

For the larger limbs or tree itself you will probably need a good working chainsaw. In the absence of a chainsaw or problems due to one that isn’t working, these simple hand tools can get you going again in short order. Chainsaws can be heavy to use for many people and require some skill on the part of the operator to handle them safely. A good bow saw and hand pruners can generally be used by young and old alike with good results.

A mechanical malfunction always seems to happen at the worst possible time or a lack of fuel to operate it can occur leaving you looking for an alternative. If you can’t get that chainsaw started, better grab your bow saw and go to work at fixing the problem.

Staying above the water line!

Riverwalker

Wednesday, July 1, 2009

Simple Survival Tools - The Shovel


One of the items that get used almost as much as my knife is a shovel. It's the best way to dig a hole and the best way to dig yourself out of one. A folding shovel for your pack, a plain camp shovel, a spade shovel, a scoop shovel or a "sharpshooter" will all come in handy for an emergency, as well as a multitude of little jobs around the house or the farm.


Can you dig it?


Staying above the water line!


Riverwalker

Friday, May 1, 2009

Ugly Drum Smoker - Step Drills


When building an ugly drum smoker, one of the best tools you can invest in is a set of step drills. These make it a lot easier to construct a smoker from a 55 gallon drum. You can drill a wide range of holes in the metal 55 gallon drums with a set of step drills. They are well worth the cost and will save you a lot of time and effort. These are especially handy if you plan on building more than one or to do improvements or upgrades to your present smoker barrel. The set I got from Harbor Freight also came with a storage pouch. They cost slightly over $10 with tax. Sometimes having the right tools for the job makes things a lot easier.


These step drills can also be used for other projects you may be working on and will always be a handy item to have in your tool box.

You can view the relatively low cost step drills at Harbor Freight here:

Step drills for less than $10:

http://www.harborfreight.com/cpi/ctaf/displayitem.taf?Itemnumber=91616

Step drills for less than $20:

http://www.harborfreight.com/cpi/ctaf/displayitem.taf?Itemnumber=96275

Got step drills?

Staying above the water line!

Riverwalker

Friday, February 27, 2009

Tool Tips - Part one

My good friend Dean in Arizona has graciously granted my request for a series of post on mechanic stuff, machine shop, and tools for the D-I-Y people out there. I hope everyone will take advantage of his knowledge and skills to solve some of your proplems or just add to your own wealth of knowledge.

Tool Tips - Part One

Hi everyone!

I'd like to take a moment to thank RW for inviting me to do a guest post on his site. I've been a long time reader of his, and his tips and ideas are great! He has invited me to pass on tips and tricks for not only what must have, should have, or how to, about tools and how to use them. My background is in the machine shop, I have a degree in automotive engineering, Tool and Die, and almost a mechanical engineering degree, so I know a bit about tools!

First, let's address the quality of your tools. I keep hearing about the poor quality of "Harbor Fright" tools. Sure, they are cheap, but I have some over 15 year's old and going strong! Not that I would use them for a living, but in a pinch, they work. If you’re not a professional mechanic, they will work fine as long as they are not abused. I was a machine shop manager for General Motors for a few years; they made fun of my Craftsman tools! I could not justify the price of SK or Mac tools, but I didn't rely on them the way they did.

I think every tool box should have at least 2 of every tool you can think of, a good set, and a cheap set, metric and standard. NEVER loan out the good stuff! When I was off road racing, I carried the cheap stuff on my bike or truck, the good stuff stayed in the pit. A few set's of cheap stuff will also be a great barter item, so get a few of everything!

So, let me go over what every basic toolbox should have. Granted, I’ll try to keep it to a minimal list, in my opinion, but it is must have stuff. Even if you don't know how or what it does, you might run into someone who can use it, fix your whatever, and be on your way! Depending on your skill level or ability, these may or may not apply, and I'm sure to get lot's of comment's about what I missed, I welcome them!

1. Socket set’s, metric and standard, regular and deep wall

2. Allen wrenches, metric and standard

3. Crescent wrenches, 4 6 8 and 12 inch

4. Screwdriver's, a full set

5. Breaker bar for the socket's

6. A flex head ratchet...a life saver!

7. Extensions for the sockets, at least 1 1/2 inches long

8. Torx wrench set. Common on newer cars and trucks

9. A small and big pipe wrench. When the crescent won't fit.

10. Tin snips.

11. Wire cutter/strippers and a connector set.

12. Chisel's, all size's

13. Hammers, a small and big one

14. A multi meter for electrical work


I know this is a minimal list, at least to me, but it will all fit into a hip roof type toolbox, and will fix 99 percent of what you may run into. If you have an ATV or some foreign vehicle, you may need some special tools for that, but this kit will do the basics at least. RW and I have discussed further posts regarding shop tips and such, maybe some how to stuff about welding and fabricating things.

We'd love to hear your input and ideas about what you'd like to see in the future!

Thanks again RW!

Dean in Az
Related Posts with Thumbnails