Showing posts with label Tips. Show all posts

Thursday, May 16, 2013

Survival Knots: The Cow Hitch


Hitches are basically a means of attaching rope or cordage to an object. The simple cow hitch is better known as the lanyard hitch. It is generally used to secure cordage or a rope to a post, an item of gear or some other object. This knot is similar to the clove hitch but instead of tying the two half-hitches in the same direction, they are tied in opposite directions. It is a very simple and basic knot.


There is a variant of the cow hitch that is easily tied and can create a more secure knot. This variant is known as the bull hitch. It is simple and easy to learn to tie and will give you a more secure knot.


By simply twisting the top loop of your cow hitch and feeding the end of your lanyard back through the loop you create a bull hitch. When tightened properly, it gives you a very secure lanyard connection to your gear. It's important to remember that keeping your gear properly secured in any situation is critical.


My personal preference is to use a bull hitch for attachment of the leg tie-down on the scabbard of my Mora. This insures a good snug fit for the scabbard of my knife when tied off.


A great resource for learning how to tie a variety of knots properly can be found at http://www.netknots.com/. They offer different sets of knot cards at a very reasonable price. The knot cards can be easily carried and used for reference purposes to insure your knots are being tied properly.


Got survival knots?

Staying above the water line!

Riverwalker


Friday, December 9, 2011

Simple Survival Gear Mods - Taking A Walk in the Dark - Lighting Up Your Hiking Stick


A stick is one of the simplest pieces of survival gear you can modify. You can put just about anything on a stick that you may need for your survival and do it in an inexpensive manner. With just a little imagination and creativity on your part, you can adapt your hiking stick to fit all of your survival needs. You can even light it up!

Now the easiest way to light up your hiking stick is to tape or strap a flashlight on it but your stick just won’t look right. Here’s a way to incorporate a flashlight on a stick that is not only very functional but won’t detract from the sleek, stream-lined appearance every survival gear enthusiast seeks when making their own survival gear.  It’s also an easy DIY project that most anyone can do with very little time and effort. 


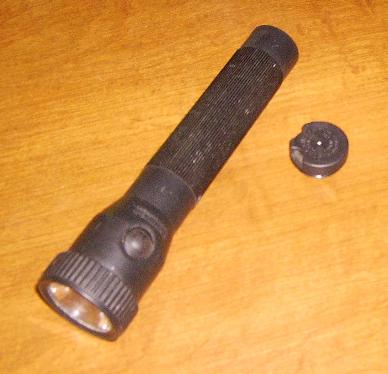
All you need is a stick (this is a main component), a flashlight (this is the other main component) that has a removable end cap and is equipped with either a push button or slide switch on the barrel of the flashlight and a small screw to fasten the end cap to your hiking stick.

“Borrowing” Mrs. RW’s Streamlight Stinger for this project because hers has a plastic case, a drill wasn’t required to put a hole in the end cap, a small screw was then inserted through the hole and used to attach the flashlight end cap to the stick.  The flashlight was then screwed back on the end cap. That’s all there is to the assembly process...quick and easy. Some wood glue or Gorilla glue should be used for a more permanent installation.  The glue was left out of the process in this instance, just in case Mrs. RW decides she wants her Stinger back.

The flashlight is now the handle of the walking stick. The flashlight is still functional and it gives the stick a great customized look and feel. You'll also need to use a flashlight with a diameter that's fairly close to the diameter of your hiking stick for the best results.

Ready to take a walk in the dark...?

Staying above the water line!

Riverwalker

Wednesday, July 27, 2011

Personal Survival Kit Options - The Belt Pouch


There are some very basic rules that must be considered when building your own Personal Survival Kit (PSK). It will have little or no value if you fail to keep certain basic requirements in mind. One of the basic requirements for any Personal Survival Kit is that it is absolutely necessary to keep it on your person at all times. There are a number of options that can satisfy this requirement. One of the best ways to accomplish this is with a belt pouch.


A small belt pouch will hold a decent amount of survival gear without affecting your mobility and allow quick and easy access at all times when needed. And since it is literally strapped to your body, it will leave your hands free for other tasks. It will go where you go and be readily available if and when a need arises.


The belt pouch in the above picture is simply an old camera case without the strap. It has a zippered front pocket and a couple of D-ring attachments on the sides to clip extra gear and a fairly large rear storage pouch. The D-rings were the attachment points for the strap which had broken but like many small camera cases it also had a belt loop. 


This belt pouch can easily accommodate a variety of survival gear in a very small package. This particular belt pouch has a rear storage compartment that easily holds a small first aid kit and an assortment of other gear. While measuring in at a very compact size (approximately 5”X 4”X 2”), it’s big on storage space for PSK items. In comparison, it’s only a little more than twice the size of a small cell phone.

When making a decision about how you are going to carry your survival kit items, a belt pouch may be just what you need. No matter how you decide to build your PSK, just make sure to keep it on you!

Got belt pouch for PSK?

Staying above the water line!

Riverwalker

Tuesday, April 12, 2011

Simple Survival Tips - Treating Infected Wounds


Survival conditions often require safe, effective, inexpensive, easy to use and non-toxic methods for the treatment of wounds and injuries that may become infected. A lack of resources or services to properly treat simple medical conditions could become a life-threatening situation to your survival. Quite often simple resources are overlooked when seeking a solution to problems that can affect your survival.

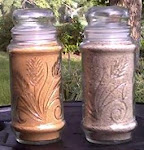
One of the simplest solutions to this problem is sugar. Sugar has been used to treat wounds for thousands of years by many different cultures. Sugar was used widely by early Egyptians to treat wounds and the infections that often occurred as a result. Sugar can be used to kill bacteria and germs in open and infected wounds almost as effectively as the best antibiotics available today.

Sugar will also help speed up the healing process of the damaged skin tissue and reduce any inflammation that may be present. This is in addition to its antimicrobial action which kills bacteria and germs. This is accomplished by the osmosis and capillary action of the sugar granules. Powdered forms of sugar will be somewhat less effective and will require more frequent treatment and changes of bandages to achieve similar results.

Simply clean the wound area thoroughly and sprinkle sugar over the cut or scrape until it is completely covered. This can be aided by using a cream (such as petroleum jelly) around the outside perimeter of the wound to keep the sugar granules in place. Then cover the wound with a clean bandage. Use gloves if possible or thoroughly clean your hands to keep conditions as sterile as possible when treating the cut, scrape or wound.

Most injuries will require the wound to be cleaned, re-treated with sugar granules and a clean bandage applied every 4 to 6 hours to obtain the maximum healing benefits. Make sure the wound is covered completely and evenly with sugar granules and covered with a clean, fresh dressing each time.

Caution: Sugar should never be applied to openly bleeding wounds as it may actually increase the blood flow and further complicate your condition.

Sugar can be used to sweeten your tea or coffee but it can also help you as a first aid treatment for infections in a survival situation.

Disclaimer: This information is provided for informative purposes only and should not be considered medical advice of any kind. Always seek qualified professional medical help when needed.

Staying above the water line!

Riverwalker
Sunday, March 6, 2011

Mrs. RW’s Cooking Tips - Tip #1 - Cooking Corn on the Cob


Boiling is a common means of preparing many food items but it can be extremely tough on your food. While many foods are prepared by boiling, a lot of nutrients, especially the soluble vitamins, can be lost in the process of boiling your food items. There can also be a loss in the flavor and texture of your food.

One of the staple food items consumed by many people is corn on the cob. It goes with just about anything or is simply great when eaten by itself, usually with a little butter added. Now the majority of corn on the cob is cooked by boiling which can affect the taste of your corn on the cob. Boiling corn on the cob causes a loss of some of the natural sugars present in your corn. There is a simple solution to help you solve this problem.

Just add a pinch of sugar to your pot of water that you will be using to cook your corn on the cob. This won’t actually sweeten your corn on the cob but it will help prevent the natural sugars in your corn on the cob from being released during boiling. This helps to preserve the natural flavor and sweetness of your corn on the cob.

Got pinch of sugar?

Staying above the “boiling” water line!

Riverwalker

Sunday, February 13, 2011

Simple Survival Gear Mods - Sticks for Survival - Part Three

Turning your hiking stick into a survival stick doesn’t have to be complicated or difficult. Using a few of those brain cells that may have been inactive for a while is usually the only thing required. The main thing you need to do is to make your hiking stick as versatile as possible. One of the simplest ways to accomplish this goal is to add an accessory pouch. With the addition of an accessory pouch to your hiking stick, you will be well on your way to creating a “survival stick”.

The size and type of pouch isn’t a significant factor but it will need to have a belt loop and should have some sort of Velcro or snap closure mechanism to insure your accessories will remain securely in the pouch. By running several wraps of paracord (at least 4 or more) through the belt loop of the pouch as the paracord is being added to your hiking stick, it can be securely attached to your hiking stick. If you don't have any paracord, you could use 100mph tape or duct tape to attach the pouch. This provides you with numerous options to add additional items to your hiking stick.


With the addition of an accessory pouch, you can carry a multi-tool, a lighter or a firesteel, a small flashlight, water purification tablets etc. or a combination of items depending upon the size of your pouch and the size and number of additional items you wish to carry. They'll be on your hiking stick and readily accessible should the need arise. You can even attach a pocket knife (the kind with a pocket clip) to the side of the pouch or you can add a second accessory pouch if you feel the need and want to add other items that may be a priority for you.

Having a good hiking stick is great. If you turn it into a survival stick, it will be even better!

Got survival stick with pouch?

Staying above the water line!

Riverwalker

Simple Survival Gear Mods - Sticks for Survival - Part Two

There are numerous gear mods that are simple and easy to do that will enhance the usefulness of your gear. Here are three simple things that make great add-ons to your hiking stick to increase its use as a survival tool.

The first simple gear mod involves simply making a couple of marks on the lower portion of your hiking stick. A couple of marks at 12 inch intervals turns your hiking stick into a simple but effective depth gauge. It can then be used to determine the depth of water at creek or stream crossings. If you live in an area with a lot of snow, it can help you determine the depth of snow in your path. You can either score your hiking stick and darken the sored areas (see pic above) or just add a piece of tape as an indicator.


The second simple gear mod for your hiking stick is to just simply add a whistle to the lanyard on your hiking stick. A whistle is very effective at creating or drawing attention to your location if something goes wrong and adds very little additional weight. It will also save you from having to do a lot of yelling and hollering! Or moaning...

The third lightweight gear mod for your hiking stick is the addition of paracord. Wrapping your stick with paracord is simple and makes a great way to carry a large amount of cordage. The average walking or hiking stick will easily accommodate anywhere from 50 to 100 feet of paracord in an easy to access manner.

While a simple hiking or walking stick is a great gear item, it can made even more useful with a few simple and inexpensive gear mods. Turn your hiking stick into a survival stick!

Got sticks for survival?

Staying above the water line!

Riverwalker

Monday, May 10, 2010

Hiking and Walking Tips - Avoiding Blisters

Blisters are one of the more common foot ailments that can affect people when out hiking or walking, especially over rugged terrain. Taking the time to properly care for your feet will save you a lot of misery when on a long hike or if you're just taking a short walk. Proper care of your feet is a necessity. You won't go very far if you don't.

Tips to Avoid Blisters

1. If you feel a blister starting, take off your hiking boots or shoes and give your feet a chance to cool down and dry out.

2. Treat any areas where you feel a blister starting by covering them with moleskin, a band-aid or duct tape to prevent further chances of blistering.

3. Put on clean, dry socks. You need to carry an extra pair with you. Wet feet will blister quickly.

4. Empty any sand, dirt or rocks from your hiking boots or shoes on a regular basis.

5. Reduce the swelling in your feet that occurs during hiking or walking by stopping to rest your feet at regular intervals.

Remember to take care of your feet and they’ll take care of you!

Got blisters?

Staying above the water line!

Riverwalker

Thursday, August 13, 2009

Frugal Prepping - Reusing Waste Motor Oil


It is always best to recycle your waste motor oil to avoid polluting our rivers and lakes. It is also against the law to dispose of improperly. But did you know that you can save your waste motor oil for your own use. Simply put the used motor oil back in the original container and mark it used motor oil. Then you will have some readily available for use when needed. You may want to filter it through an old tea strainer to make sure there are no large particles but otherwise it should be ready for re-use.


There are several good uses for used motor oil that work great.

First; it can be used as a substitute for bar and chain oil in your chainsaw (DON'T use it as a fuel additive).

Second; it can be put in a squirt can and used to oil hinges, latches, etc.

Third; keep a couple of old rags handy and use them to apply a coat of oil to your shovels and other garden tools to help prevent damage from rust (make sure you wash the dirt off first).

You can save some money and the environment at the same time.

Special Note: Make sure that any used motor oil you don't use is properly re-cycled according to your federal, state and local laws.


Staying above the water line!

Riverwalker

Thursday, August 6, 2009

Preserving Shallots - Keeping Greens Fresh


There are many types of raw food items that store well if given a little drink of water. It is a great method for preserving parsley but works well with other types of greens. Florists have used this trick for years to preserve fresh flowers and it works quite well. Here is but one more example of prolonging the shelf life of your fresh food items.

Mrs. RW and myself both like shallots, especially on a fresh garden salad. To keep the shallots fresher and thereby maintain their nutrient values to the utmost extent possible, we use the same method when preserving shallots as we do with parsley.

Simply place them in a glass container with a small amount of water and wrap lightly with some plastic wrap to help retard the effects of dehydration. This keeps your shallots fresh and tasty. This is a simple but effective way to preserve the freshness and the quality of fresh food items, especially greens. Fresh always tastes better and is actually better for your health.

Keeping it fresh?

Staying above the water line!

Riverwalker

Monday, August 3, 2009

Food Storage - Wheat Storage Tip

Wheat is a food grain that has very good nutritional value. It contains large amounts of protein and several nutrients necessary to promote good health, including calcium and niacin among others. When storing wheat for long term storage, it is necessary to kill or destroy any bugs, microorganisms and weevil eggs that may be present in the wheat. Failure to do so may leave you with a large amount of contaminated wheat.

One of the simplest and safest ways to store wheat is to use “food grade” diatomaceous earth. Make sure that you use only “food grade” because the diatomaceous earth used in pool filters may contain algaecides and fungicides that are harmful if consumed. Using food grade diatomaceous earth is a simple, safe and inexpensive method to get rid of those pesky "critters" that may contaminate your wheat when being stored for long term purposes. Diatomaceous earth is also very easy to use and requires no special skills or preparation.

Most wheat is usually stored in 5 gallon “food grade” buckets for long term purposes. Treating wheat with food grade diatomaceous earth for storage in a 5 gallon container is a simple and easy process. Simply add approximately 1 1/2 cups of food grade diatomaceous earth to each 5 gallon bucket or container. Mix the food grade diatomaceous earth into your wheat as you are putting it in your storage bucket. Then to thoroughly mix the two, put the lid on and simply turn your bucket on the side and roll it around to mix the wheat and diatomaceous earth together so that all the wheat is coated. The wheat can be used as is, since the food grade diatomaceous earth is organic and the consumption of it is not harmful to people or other animals. The wheat can also be rinsed with water and dried but this step is not required in order to make the wheat usable.


"edit"

IT IS VERY IMPORTANT THAT ONLY THE NATURAL OR ORGANIC FORMS OF DIATOMACEOUS EARTH BE USED FOR INSECT CONTROL OR FOOD TREATMENT.

CAUTION: Diatomaceous earth can be a respiratory hazerd and care should be taken not to breathe in the dust particles. Use a good dusk mask. It also is highly absorptive and can dry your your skin out if handled without gloves. Use a good pair of gloves to protect your hands when working with diatomaceous earth.

Both pool grade and organic (i.e., the natural form) diatomaceous earth come from the same sources. They are processed quite differently however. The organic grades are dried and ground up. As an additional part of the process, the pool grade is often chemically treated and heated which causes the silica in diatomaceous earth to form crystalline silica which can be a health hazard. The natural form contains non-crystalline silica and this is not a hazard to the human body which can usually dissolve it without any problems when ingested.

Staying above the water line!

Riverwalker

Saturday, July 18, 2009

Removing Rust from Cast Iron Pots

The following is a great little tip from a reader that I received in an e-mail and I’m hoping it can be of benefit to everyone out there. It’s a simple way to remove rust from cast iron pots. Special thanks to Eltexan for this tip.

RW,

I'm not sure how I ended up at your site - BUT - I did, and read with interest a lot of posts about a variety of things. I think it was last winter that some folks were talking about reconditioning old cast iron cookware. Most of it dealt with reseasoning, but I saw nothing about removing 50 years of rust.

About 25 years ago I got involved with pre-1840 re-enactors and began to build a collection of "period" cookware. At a junk yard south of Nacogdoches I found a pot-bellied cast iron pot that someone had used as a planter for something. It was full of dirt and rotted roots which, when dumped, revealed a LOT of heavy rust. I figured it would at least look appropriate, even if I couldn't cook in it, so took it home.

Then I remembered a trick an old blacksmith once told me about how to remove heavy rust from old hinges. Vinegar!

I washed out the pot as best I could and filled it with cheap, plain, distilled vinegar, and set in a dark corner of the garage. It started to work immediately. By the end of the week there was a "head" of varicolored foam sticking up about eight inches above the pot. I poured it out and filled it again. All-in-all, it took about three weeks and the inside of the pot looked almost new - pitted in some areas, but certainly usable. I reseasoned it and cooked beans and chili in it for the next fifteen years for large groups of campers.

Since that first beginning, I've re-claimed more than a dozen old pots and skillets that way. It really works.

Two warnings rolled into one: Find a protected place to do this outside. The chemical reaction really stinks and when it bubbles over it leaves a stain on concrete that will last as long as the slab.

Keep walkin' and talkin'.

Eltexan

Wednesday, July 15, 2009

Blades for Barter


Many times people wonder what items would be the best to use for barter. One of the easiest items to trade is knives. Many times the absence of a knife of any type can be a problem. For those times when you need a good knife handy there aren’t very many substitutes that can take their place. Knives will always make good barter items.

A good quality knife is hard to find at an inexpensive price but when choosing knifes for barter purposes even a cheap knife can have significant trade value to someone that lacks a knife. You can easily find cheap knives at garage or yard sales that can be saved for barter purposes, as well as backups for emergency use.

I’m always on the lookout for inexpensive knives that are suitable for use as barter items. Granted, if I come across a good quality knife at a cheap price I will probably keep it for my own use but many times you can come across bargains that will work great for barter purposes.

In the picture above are four inexpensive pocket folders that I bought at a garage sale for $1.00 (25 cents each!); they may not be top quality but with a little cleanup and some decent sharpening they will give me extra items to barter with if necessary. I simply throw one in each of my EDC pouches or in the glove box of my vehicles and they are available if needed.

There is also a new site, http://www.garagesalestracker.com, that allows users to find or list their local garage or yard sale. This is becoming an every more prudent way for families to either raise money or find great bargains, purchase household items, clothes, and other miscellaneous items at what are sometimes a very negotiable price. They have also just implemented a large flea market and consignment store directory.

Cheap but useful to everyone will make these knives very good barter items.

Got blades for barter?

Staying above the water line!

Riverwalker

Monday, June 29, 2009

Home Food Dehydrating Tips and Tricks


Hi everyone! Dean in Arizona here! I'd like to thank RW for letting me ramble on yet again about my favorite toy, the food dehydrator!

Special Note: I am by no means an expert at this, but I've played with it almost every day for 6 months or so, and messed up a little bit. Ok, quite a bit! So, let me share my mistakes and victories with everyone.

1.) FRUIT

I have a small orchard in my yard, maybe 1 of everything you could want. Orange, lemon, grapefruit all do great in Arizona, I can't eat them fast enough. I tried to dehydrate some tangerines a while back. My book was a bit vague on them, so I just segmented them and tossed them in.

Hmmm…they ended up looking like a skin shedded by a snake! Just a paper shell! I ground them in the blender; mixed in water…it was tolerable, but not even close to being Tang!

2.) VEGGIES

MOST veggies need to be blanched or steamed before drying, to save color and texture. Mushrooms, eggplant, onions, tomatoes, squash, and peppers can just be sliced and tossed in. Remember, these will all shrink to at least 1/3 the cut size, so if you want them for soup or stew, cut them a bit on the bigger side. My book says to cut potatoes 1/8 thick, they end up looking like a potato chip. Good for scallop taters, or to make mashed potatoes.

3.) MEAT
.
Decide if you’re making jerky, or saving it for stew meat. Jerky needs to be raw meat, marinated in your favorite stuff. I like soy sauce, Tabasco, lemon juice, salt and pepper for at least 24 hours. If you want to save it for stew or soup, you need to cook it to medium rare or medium, to preserve the tenderness. Just toss a cheap round steak, flank or skirt steak in the oven, cook to medium, let cool and slice into 1/2 inch cubes. Pre-cooked meat won't shrink much, so keep it to the size you want. Remember to use LEAN meat, as a lot of fat will cause it to go bad quicker.

4.) FISH

I haven’t had any luck with fish yet. There was a sale this week on flounder, one of the few fish I like. I cubed up a pound of it, tossed it in...And it came out gross! It was as greasy as bacon. I'll try again after a pre-cook.

Hope you all appreciate these tips, it's a lot cheaper to do it at home than to buy the pre-packaged stuff, you can preserve what you like to eat and save weight. It takes a little time but saves some cash. Saving money. This is something I like!

Thanks again RW!

Dean in Arizona

Saturday, January 24, 2009

Wooden Gun Stock Refinishing Tip

With a great many people buying used guns, especially the military surplus rifles, there is sometimes a need to refinish the wooden stocks due to abuse or neglect. There is a simple trick you can use to get that smooth satin finish that is found on new wooden gun stocks. You can turn it into a showpiece with very little effort if done right.

One of the things that I have done frequently is refinish wooden gun stocks for friends and other people. They have either accidentally or through neglect allowed their rifle stocks to become less than perfect and as a result need to refinish them.

To get a satin smooth finish when refinishing a wooden gun stock all you have to remember is that in the process of sanding down a wooden gun stock dust will get inside the grain of the wood. This dust can be hard to remove properly with a dust cloth. The best way to remove this dust is by using a cloth soaked with denatured alcohol. The denatured alcohol will clean the dust from sanding out of the grain of the wood but will dry quickly in the process. Then when staining and sealing the stock you will be able to get a really smooth finish because the fine particles from sanding have been removed with proper cleaning.

When using this technique you will need to make sure you've allowed the alcohol residue to evaporate fully before applying any stain, lacquer or varnish. This technique can also be used when refinishing a piece of wooden furniture.

Staying above the water line!

Riverwalker

Tuesday, December 16, 2008

Tuesday's Tips for Preppers - Simple Knife Sharpening


There’s a simple trick that a lot of people don’t know and that is it’s more important and a lot easier to keep a knife sharp than to wait until it’s become dull to sharpen it. An inexpensive hand-held ceramic sharpener will work great to help keep the blade on your knife sharp.

There are many inexpensive hand-held ceramic sharpeners available to help you keep your blades sharp. A few quick passes and you’re done. Keeping one or two on hand in the kitchen, your tool or tackle box or BOB will help you keep an edge on your blades.

You can see a great example of an inexpensive hand-held ceramic sharpener that I use personally here:

http://www.rapala.com/products/accessoriesdetail.cfm?name=Fillet%20Knife%20Sharpeners&category=Knife%20Accessories

The ceramic rods will get dirty with use. To clean the ceramic rods simply wet a cotton string, sprinkle some Ajax or Comet on the string and then pull the string through your sharpener to clean the ceramic rods.

Remember...Hone your blade to keep it sharp before you have to sharpen your knife.

Staying above the water line!


Riverwalker

Saturday, December 13, 2008

Simple Food Storage Items - Worcestershire Sauce

There are many spices, herbs and flavorings that can add zest to an otherwise plain meal. One such simple food item is Worcestershire sauce. It is relatively inexpensive and can make a great deal of difference in your meals prepared from food storage items.

Worcestershire sauce should be stored at room temperature before opening. No refrigeration is necessary for Worcestershire sauce, but once the bottle has been opened, it should be refrigerated in order to maintain the best flavor. Do not freeze Worcestershire sauce. Just give the bottle a good shake before each use.

The recommended shelf life of Worcestershire sauce is 24 months. It is recommended that Worcestershire sauce be consumed within 2 to 3 months after purchase to ensure the best possible flavor. Generally, all Worcestershire sauces are microbiologically safe to eat for an indefinite period of time.

The ingredient that sets Worcestershire sauce apart from most sauces is tamarind, the fruit of the Indian date. The pods, which resemble a brown pea pod, contain thick, sticky pulp that has the consistency of dates and a spicy flavor. Although often referred to as tamarind seed in recipes, it is only the pulp surrounding the seed that is normally used. Tamarind fruit contains more sugar than any other fruit, but is balanced by its high content of acid, thus giving it that sweet and sour taste unique to Worcestershire sauce.

“Lea & Perrins Worcestershire Sauce British and American recipes differ slightly in that the British recipe uses malt vinegar while the American version uses distilled white vinegar, giving the British version a slightly deeper flavour. Also, the American version uses high fructose corn syrup, while the British version has sugar. The British version is sold in Canada. Lea & Perrins uses a distinctive paper wrapper for the version sold in the United States. In the UK, the iconic bottle is well known to consumers for both its shape, and also the orange and black label. Lea & Perrins Sauce is also very popular in New Zealand and is used much in the same way as it is in Britain.”
Source: http://en.wikipedia.org/wiki/Lea_%26_Perrins

For the DIY people out there: Make Your Own Worchester Sauce

Any meal can be made even better with a few simple flavorings added. A little Worcestershire sauce goes a long way.

Got sauce?

Staying above the water line!

Riverwalker

Food Conservation Tip - Reusing Leftover Marinade

It seems like an awful waste to discard that flavorful marinade mixture when preparing a meal. Don't be tempted to reuse leftover marinade without taking a simple step first. During the contact with raw foods, the marinade will pick up harmful bacteria that could make you ill. To conserve your marinade is really quite simple. You can cook leftover marinade before using it to baste with or to add to a sauce. Just make sure you boil it for at least 5 minutes to destroy any harmful bacteria.

Remember, food should be marinated in a non-reactive container, one made of glass, porcelain, clay or stainless steel. Ziplock plastic food bags are great for marinating. Avoid aluminum and cast iron which can react with the acids in the marinade and possibly ruin your meal.

Use a shallow bowl so the marinade covers as much of the food as possible. Make sure you turn the food at least once every hour. Let your food marinate in the fridge, not on the kitchen counter, this will also help your food from becoming contaminated with harmful bacteria.


Staying above the water line!

Riverwalker

Monday, December 8, 2008

Tuesday's Tips for Preppers - Safe Knife Usage

Like any good tool, a knife can be a valuable part of your equipment. Making sure you can use that tool safely will make it even more valuable. Here are a few tips for using your knife safely.

Tips for Safely Using A Knife


1.) Make sure the knife is the right kind for the intended use. Check for any damage to your knife. If it’s damaged, be safe and use a different knife or buy a new one.

2.) Take care of your knife. Keep it clean and keep it sharp. A sharp knife is an efficient knife and more useful than a knife with a dull blade.

3.) Always close or sheath your knife when not in use. Don’t leave your knife lying around where an exposed blade could cause an unexpected injury.

4.) Stabbing or shoving your knife into the ground is a perfect way to damage your knife. Don’t do it!

5.) Make sure the cutting area is clear of obstructions and other people. This will ensure that any travel from a slipped blade will not hit anything or anyone causing an unexpected injury.

6.) Always cut away from yourself. Make sure no parts of your body are in the path of the blade should it slip or do something unexpected.

7.) Avoid lending your knife to anyone unless they are familiar with the safe use of knives.

8.) Except in emergency situations, don’t use your knife if the lighting conditions are poor or if it is too dark to safely see what you are cutting.

9.) Never attempt to catch a falling knife. This is an extremely dangerous thing to do.

10.) Don’t throw your knife at anything or to anyone! This will most probably result in damaging your knife or seriously injuring someone.

Remember, safety is no accident!

Staying above the water line!

Riverwalker

Friday, December 5, 2008

Simple Survival Foods - Cheese and Processed Cheese Products

There are many different processed foods available today. Unfortunately, not all of them are what you might expect. Many bear little or no resemblance to the real or actual product. Processed cheese is one that you should be aware of the different and varied types and their relationship to the actual food itself, cheese.

Basic Information About Processed Cheese

1.) Processed cheese is subject to legal restrictions and standards.

2.) Processed American cheese must contain at least 90 percent real cheese.

3.) Products labeled "cheese food" must be at least 51 percent cheese (most are 65 %).

4.) Products labeled "cheese spread" must also be 51 percent cheese. The major difference being that such foods have more water and gums to make them spreadable.

5.) “Cheese product" usually refers to a cheese that has more water and less cheese than American cheese, cheese food, or cheese spread. The specific amount of cheese in foods labeled “cheese product” are not regulated and vary greatly.

6.) "Imitation cheese" is not required to contain any minimum amount of cheese. Unfortunately, cheese is usually not its main ingredient.

Quality processed cheese should have certain general attributes. It should resemble cheese and possess a minimum amount of cheese type flavor, preferably with a "bite" such as a sharp cheddar cheese. The processed cheese should also be smooth and evenly colored. It should not have a rubbery texture and should not melt in the mouth.

You can find additional information about the nutritional value, the safe handling and storage of cheese and cheese products, and the many different types of cheese and cheese products here:

http://www.nationaldairycouncil.org/nationaldairycouncil/nutrition/products/product_cheese.pdf

Say REAL cheese please!

Staying above the water line!

Riverwalker
Related Posts with Thumbnails