
Dear Preppers and
Survivalists,
As some of you
know, I was terminated just after Thanksgiving.

Two Shirts and One Pair of
Pants
Well, one of the
things I have been doing (besides looking for a new career) is going through
all my stuff. Lo and behold, I found some junk, as in trashed clothes, that I
don't need any more. I was going to throw the rags away, but I realized
something. I could reuse the uniforms.
At first, I
thought I could reuse the old, dirty uniforms as cleaning rags. I could cut up
the old shirts and pants and use the cloth to clean weapons, mop up oil drips,
or as disposal wash rags, especially the 100% cotton shirt.

Zippers,
Buttons, Belt Loops, Pieces of Cloth,
even the Shirt Pockets
So, I removed all
the button, zippers, and belt loops. Yes, belt loops because they are a pain in
the *ss to make. Next, I started cutting up the old, stained uniforms; I even
removed the shirt pockets, then I stopped.
I stopped because
I realized I could make a ditty bag. O.K., not a 'real' ditty bag but at
least a small bag for organizing stuff in my family's emergency evacuation kit.
This small bag
could be used to hold a first-aid kit, toiletries, fire-starting kit, or ...
what ever you can get in the bag.
So ... No pun
intended.

12-inches
of Pant's leg, Shirt Pocket, Belt Loops
and
Small Circle of Cloth from Thigh-area of the Pants
After cutting up
the uniform pants, I took each pant's leg and cut it off about 12-inches from
the bottom. Next, I cut a small circle (a little bigger then the cut end of the
pant's leg) from the thigh section of the pants.
The picture shows
the items I started with to make the first ditty bag.
This bag will
have a pocket on the inside. Now, you know the reason I saved the shirts'
pockets.
So...
To sew the
recycled shirt pocket on the inside of the pant's leg, I turned the pant's leg
inside out before I began sewing.

Shirt Pocket Sewn on Inside of Pant's Leg
I have a crappy
picture of how I sewed the pocket to the inside of the pant's leg. I'm not
going to use it. Instead you're going to just see the finished product.
Needless to say,
I would redo the location of the pocket. It is too close to the top of the
ditty bag to allow the bag to be folded over. In the future, I would sew the
pocket about two inches from the bottom of the bag.
Of course, some
folks are going to ask, "Why don't you just turn the bag over and make the
'top' the 'bottom?'
I thought of
that, but ...
First, the cut
end of the pant's leg will fray unless it is hemmed. Second, the pocket would
be upside down, then. ; - )

Sewn Bottom of Two Ditty Bags
Next, I took the
round piece of material, I cut from the pant's thigh-area, and sewed it to the
bottom edge of the pant's leg.
As I was sewing,
I kept about a 1-inch seam around the bottom of the ditty bag.
Needless to say,
the picture shows two ditty bags. The one on the left is the round-bottom ditty
bag (I have been writing about) The one on the left, I just sewed the cut end
of the pant's leg shut.
Once, I finished
with my sewing, I folded the bags right-side out.
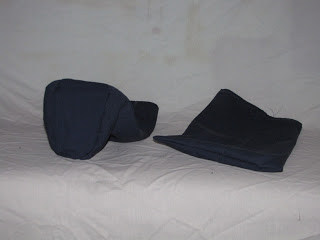
Bottom of Finished Ditty Bags
I don't have a
good picture of the finished bags, but I do have a picture of the bottom of the
finished bags, right-side out.
To finish up the
bags, I added a belt loop to the outside top of the bags. The belt loop will
act as a place the tie a 'smart' cord to secure the ditty bags to my pack.
So... Again, no
pun intended.
You can modify my
design. One mod is to add a strip of Velcro to the pocket to secure any items
stored in the pocket. A long-strip would keep everything in the pocket. A
short-strip of Velcro, one to two inches, would just hold the pocket shut.
Another mod would
be to use the pant's zipper to close the ditty bag.
Needless to say,
y'all are a smart group of people, if you have another modification; please
tell us about the mod in the comments.
Link:
Frayed Knot Arts
- The Sailor's Traditional Ditty Bag and Ditty Box
Note:
If you're
interested in knots, you will want to check out the home page and its links.
Very cool!
My thanks go out to Someone
You Know for a very informative guest post.
You can also check out some
of the other great posts by Someone You Know at:


5 comments:
My last day of work is monday. Hope we both find work soon.
STILL wish you'd get rid of that cussed word verification.
My condolences on loss of job(s) - its a tough market, despite what the media is saying otherwise (like the stock market is the Real World).
The only ditty bag projects I've done are the old 'cut-off pants legs' tent pole option. The main wear points on pants are pockets, crotch, cuffs and button loop areas. Most of the rest can be used - cutting the front pockets out themselves are ready made, needing only the cord tunnel.
...yep, i see a couple o these in my future, got plenty of clothes in "rag bags"(hate to throw out,no real donation value as most are old work clothes)some get used when catastrophic failures require disposables...anyway, is good cold weather project while stuck in the cave, never let a good thing go to waste huh ?
...on the coming of new employment, KeepTheFaithShipmate...WeWillWin
Does the pantleg hem (top of bag) have room inside to run a cord to make a drawstring to secure it shut?
Very creative! I hope the unemployment thing doesn't last for you. I've been there, though it's been a while, and it's not a good time. You are so much smarter than the average bear though, you will fare better than most, without outside assistance. There's much to be admired in that.
Post a Comment