Showing posts with label Guns. Show all posts

Saturday, March 4, 2017

How airsoft and skirmishes can teach you about being prepared for survival

Many airsoft BB gun users take part in organized skirmishes - aka fake battles and survival scenarios. A lot of people don’t believe in ‘playing’ with guns or allowing youngsters to play with guns or take part in skirmish activities as they believe it’s setting a bad example. However, using airsoft BB guns and taking part in skirmishes can teach you a lot about being prepared and surviving in any situation.

Honing your shooting skills

You may think that in real life you will never need to know how to shoot a target, but at one point or another, you may well need to be able to do so. Its one thing shooting targetsat a shooting range; it’s completely another shooting a moving target during a skirmish, which is why skirmishes are so useful when it comes to honing your shooting skills. When it comes to surviving in the wilderness, being able to shoot a moving target - ideally, at a distance away - is crucial. Proving that skirmishes are an ideal way to do this, many police forces and military forces use BB guns and skirmishes to help new recruits hone their shooting skills.  

Learning to work as part of a team

Another important lesson that skirmishes can teach you is working successfully as part of a team. If you’re someone who watches survival films or war films even, then you will know that when it comes to survival, teamwork is often crucial. Skirmishes teach you how to not only look after yourself but also your team members, as well as how to obey orders and do as you’re told. If you are put in a leading position, skirmishes also teach you how to lead a team and determine who does what role within it. When it comes to survival (and preparation), being a good delegate is important - this is a skill that leading a skirmish team will allow you to develop.

How to stay hidden

Just like in real wars, the key to surviving when under attack is being able to stay hidden. Taking part in skirmishes teaches you how to stay hidden by camouflaging yourself. It also teaches you how to pick the opportune moment to reveal yourself and how to determine when that is. Talking about careful thinking, it’s also crucial to learn to use ammunition wisely, which is another key thing that skirmishes teach you. You only have a certain amount of ammunition and have to learn to make it last, if you’re going to survive, that is.

Adapting to different environments

Last but not least, skirmishes teach you how to successfully adapt to play in different environments. Sometimes matches will be held outdoors in woodland areas other times they will be held in indoor areas like old malls. If you’re going to survive whatever is thrown at you, you need to know how to adapt to different environments and use your airsoft skills successfully in each of them. They say that practice makes perfect, so the more skirmishes in different environments you compete in, the better.

Airsoft BB guns and skirmishes can teach you a lot about being prepared and surviving anything, from a Zombie apocalypse to a terrorist takeover.

Staying above the water line!

Riverwalker


Thursday, January 16, 2014

The Benefits of Using Airsoft Guns for Shooting Practice

While the politics and opinions of gun ownership continue to be debated, one aspect that remains constant is the most important factor regarding owning a firearm: safety. The safety of gun ownership is mostly expressed though firearm storage and handling the weapon properly. Learning how to correctly control, aim and fire a gun and maintaining these skills are the difference between responsible gun owners and everyone else. Regardless of the purpose of possession, whether for safety, hunting, survivalist or hobby, regular shooting practice is a must.

In recent years, heading to the range has become increasingly difficult due to a practice ammunition shortage. This has increased the cost of ammunition has made maintaining one’s shooting skills inaccessible for many of the population. The solution for many has been airsoft guns, which use plastic pellets for ammunition for shooting practice.

What target practice used to look like

Cost-Effective and Convenient Option

The difference between training ammunition used for real guns and airsoft versions can be measured in dollars, not pennies, per round. Thousands of quality plastic pellet rounds can be bought for less than ten dollars. Compare this to twenty dollars for only fifty real rounds. These price differences dictate that the price of purchasing a new airsoft gun will be offset within a few practice sessions. Cheaper practice sessions represent more frequent training and increase comfort and safety with a firearm.

Another benefit to the wallet and schedule of utilizing airsoft guns is the ammunition does not require one to travel to a shooting range. These danger free rounds allow gun owners to perform target practice in their garages or backyards. This eliminates range fees and travel making frequent shooting practice and increased safety extremely convenient and affordable.


Realistic Practice

Today’s airsoft guns are far from the kid’s toys they used to have a reputation for and many are now almost exact replicas of almost every available handgun and rifle on the market today. They have the same look, weight and feel of the real versions. In addition, the airsoft adaptation can utilize the same accessories and fit in the same holster as a true firearm.

Depending on the type of airsoft firearm, much of the function of the real version can be maintained as well. Spring action versions are the least expensive but are also the least realistic and have a slow reload speed. Automatic electric guns are more representative of automatic or semi-automatic firearms with their quick reloading but lack the break and recoil feeling of pulling the trigger. The best airsoft guns and rifles are the gas blow back versions that are as close to the real thing that isn't a real firearm. Though they are the most expensive option, they share the same inexpensive ammunition as the other two types.

If it’s good enough for them, it’s good enough for anyone

Airsoft firearms have become so realistic they are commonly used by military and police forces for safety demonstration, target practice and even tactical training. The airsoft allows these essential services to mimic any situation they may face at a fraction of the cost and much more safely than using live rounds. The best gun instructors around the country are strongly pushing their students to include airsoft training to supplement live and dry fire training to become comfortable with their weapon.


Safety First

All of these benefits add up to the most important part of gun ownership, safety. A lifelike replica airsoft allows rehearsal of every aspect of handling a firearm. The exact same precautions utilized with the real version can be applied to the airsoft. Splurging for the blow back gas airsoft guns and rifles allows for an authentic shooting experience that directly translates to the true variety.

The only gun safer than an airsoft

The ammunition is safer as well. Small plastic pellets carry a proportion of the danger and cost of real bullets. Daily practice in the garage or backyard can occur with less concern of tragic consequences to others and the wallet. Frequent, real world training that increases confidence and skill is a benefit of airsoft firearms that make them an essential accessory of any gun owner.


This article was written by an Editor for Airsoft RC . Airsoft RC has a wide selection of airsoft guns for both enthusiasts and beginners.


Staying above the water line!

Riverwalker

Saturday, March 2, 2013

Just Another Gun Pic


Gratuitous Gun Pic

Got bipod?

Staying above the water line!

Riverwalker

Sunday, February 17, 2013

RW's Gun Pics - My Rifle


This is my rifle. There are many like it but this one is mine.

Got ranch?

Staying above the water line!

Riverwalker

Thursday, January 3, 2013

We’re gonna need more bullets.


In light of recent events, all the talk about new gun control measures has sparked the sale of firearms to all-time, record high levels. Unfortunately, with an increase in firearms purchases comes an increased need for ammunition for those firearms. It is important to remember that a rifle without ammunition is little more than a fancy stick and can quickly become little more than a club and a pistol becomes a poor substitute for a hammer.

A quick check of almost any outlet selling ammunition will show that the stock of ammunition seems to be drying up faster than a stock pond in the August heat. It is extremely unfortunate that responsible gun ownership may be crippled by the simple fact decent supplies of ammunition are quickly disappearing off the shelves. 

The simple truth of the matter is quite plain...

We’re gonna need more bullets.

Staying above the water line!

Riverwalker

Thursday, October 11, 2012

Riverwalker's Gun Pics - Black Powder Pistol


Got black powder?

Staying above the water line!

Riverwalker

Wednesday, September 26, 2012

Riverwalker's Gun Pics - Customized Ruger 10/22 Rifle


Customized Ruger 10/22 Rifle

This custom Ruger 10/22 looks really good with the new Ruger BX-25 magazine.

Got custom rifle?

Staying above the water line!

Riverwalker

Thursday, September 20, 2012

Riverwalker's Gear Pics - Hog Hunting Accessories


Just some pics of hog hunting gear.

 Staying above the water line!

Riverwalker

Sunday, September 9, 2012

Air Rifle Maintenance - Installing a Breech Seal on a B3 Air Rifle


The maintenance of your gear should be an essential part of your daily routine. While the majority of repairs can be outside the expertise of the average person or require specialized tools, there are a few minor repairs that can be done to your equipment to keep it in the best operating condition possible. One of the simplest and easiest repairs that can be done to a B3 air rifle is installing a new breech seal. This will also help to keep it performing properly.


The first thing you will need to do is order new breech seals if you don’t have any in stock. My breech seals were ordered from Archer Air Guns and arrived in a very timely fashion. They were also decently priced and the shipping costs were reasonable. The price of an individual breech seal figured out to be only a $1.75 each. The breech seals came in a package of six for $6.99. Two packages were ordered since the breech seals in both my B3 air rifles will be replaced and only two are required (one for each rifle). The remaining breech seals will be kept for spares.


Next make sure your air rifle is unloaded. Then, use the lever located under the barrel to cock the rifle and expose the breech seal. Once the breech seal has been exposed, you will then be able to access it so that it can be replaced. The breech seal will get hard and brittle after a while and will affect the power of your B3 rifle if not replaced on a fairly regular basis. A package of six breech seals should cover your replacement needs for several years of regular use of your B3.


Once you’ve located the breech seal, use a screw driver or similar object to pry the old breech seal out. Once you have the old breech seal out, make sure to get all the old pieces of seal out and clean the chamber before replacing the seal.


The new breech seal can be easily installed by hand and then the firing chamber can be closed to set the breech seal. Total time for this simple repair is less than five minutes and will keep the power of your B3 at a respectable level.

These air rifles can often be found at a relatively low cost at yard and garage sales. Many times these air rifles are being sold simply because they have lost power. In most cases, these air rifles only need to have their breech seal replaced to restore their original power levels.

Got maintenance power?

Staying above the water line!

Riverwalker


Sunday, September 2, 2012

Shooting After Surgery - Mounting a Scope on a B3 Air Rifle


There hasn’t been an opportunity to do much shooting after my surgery. The doctor said to pretty much forget about using the twelve gauge shotgun, the M&P 15 or my Mosin-Nagant for a while. That left my choices fairly limited. It was time to drag out the springer for a little shooting practice.


I recently picked up a little 4x air rifle scope (Tasco) at the big box store and decided to mount it on one of my springers. At a cost of $5 (it was clearance priced), I figured this might make a nice addition to my springer. It might even help an old guy with bad eyesight actually hit the target. Cheap scope on a cheap gun makes a good combination for my pocketbook.

There’s not a whole lot of expertise required for mounting a small scope on an air rifle. Just line the mounts up on the grooves in the receiver and tighten them down after checking for proper eye relief. Then shoot a few rounds and make the necessary windage and elevation adjustments till you can hit center target. 


I also took the time to change out the breech seal. This one was in pretty bad shape and I wanted to get the power of this air gun back up to speed. The breech seal will go bad after a while and the power of your air rifle will be significantly diminished if not replaced. I’ll cover that aspect in another post later. Many times you can pick up these B3 springers at garage or yard sales for $40 or less. Usually the only thing wrong with them is the breech seal has gone bad.


Shooting from a kneeling position and a standing position at a fifty yard target (the distance to my trash cans), the pellets were hitting off to the left. After some adjustment, I got four pellets to pretty much hit center mass. Then to double check everything, I put up a new target and shot a few more rounds. Everything still looked good.

If I see another possum digging in my trash, he better watch out!

Got springer with a scope?

Staying above the water line!

Riverwalker

Friday, August 24, 2012

Riverwalker's Gear Pics - Ruger BX-25


Ruger BX-25

Got 22LR magazines?

Staying above the water line!

Riverwalker

Monday, August 20, 2012

Ammo Storage Tip - The Mini-Ammo Storage Case


Buying bulk rounds of ammo can save you a lot of money but it can also cause you a few headaches. One of the main types of rounds that I purchase in bulk is 22LR cartridges. Unfortunately, the cardboard box that holds the rounds isn’t the best container for storage once it’s been opened. There is a simple solution to this problem.

More than once I’ve had cartridges lying all over the place when an opened box gets accidentally knocked over or spills in the glove box or console. Using one of those little water-proof tackles boxes for storage of your loose cartridges will give you a secure way to store your ammo. After the bulk cardboard container has been opened, it’s difficult to make sure the rounds stay secure.


This is a good way to store your loose rounds.


This is not a good way to store your loose rounds.


You can also place one or two packets of silica gel inside the case to keep moisture levels under control. This will further protect your ammo. These little cases will also hold more than enough rounds to do some serious plinking.

They would also work well for a survival cache if you wanted to securely stash a few extra rounds.

Got mini-ammo case for secure cartridge storage?

BTW, these little boxes are also great for making small survival kits.

Staying above the water line!

Riverwalker

Saturday, March 17, 2012

DIY Survival Gear Mods - Securing Shotgun Shells in a Holder


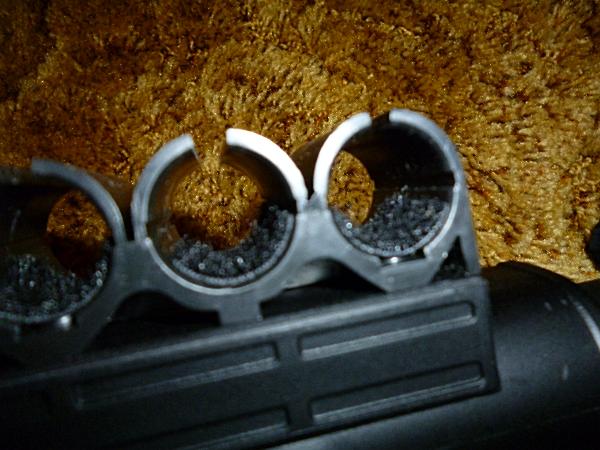
The last thing you want to do is lose your shotgun shells from their holder. Those extra rounds are important and you don’t want to risk accidentally losing them. If they don’t fit snugly in their holder, there’s a chance they may fall out and not be there when they are needed. There is a simple and low cost solution to this problem.

While elastic butt cuffs don’t normally experience this problem, the hard plastic shell carriers that are often used on collapsible gun stocks may create a problem if you want to make sure your extra shotgun shells are secure. The plastic cases on your shotgun shells when combined with a plastic shotshell holder can be a slippery situation. 


All you need to solve this problem is a package of Velcro fasteners. A small package of these fasteners cost approximately a dollar and will help solve the problem of keeping your shells secured in the shotshell holder on your shotgun.


The package comes with two different types of fasteners. The loop kind and the fuzzy kind in small squares that don’t require you to do any further modifications. They've got sticky stuff on the backside and all you need for this gear mod are the fuzzy patches.


Just strip the plastic backing off the fuzzy patches and attach them directly to the inside of the individual shotshell holders. Your shells are still easy to get out and will remain snug in the holder. This is an inexpensive and simple gear mod for your shotshell holder.

Got DIY gear mods?

Staying above the water line!

Riverwalker

Saturday, January 21, 2012

H&R .410 Gauge Tamer Shotgun - Tip #4 - Shell Storage Compartment Adjustment


One of the great features of the H&R .410 Tamer shotgun is the shell storage that is integrated into the buttstock. This feature allows you to carry extra shells that are easy to access when needed. Unfortunately, this feature may need adjustment due to wear and tear to insure your shell cartridges stay secure in the holder integrated into the buttstock.

There are two screws on the backside of the buttstock that actually secure the shell holder to the buttstock of the Tamer. These may need additional tightening from time to time in order to keep the shell holder secured to the buttstock. The main adjustment for shell retention is the two screws located on the front side of the shell holder.


The screws on the front side of the integrated shell holder have a small compression washer underneath that puts tension on the shell cartridges. This helps to hold them in place but also makes them easy to remove when needed. There are basically three things you may need to do in order to make sure your shells remain secure in the holder.


If the compression washer is in fairly good shape, all you need to do is tighten the screws a quarter to one half turn in order to tighten up the retention of your cartridges. If the wear on the compression washer is bad in a certain spot, the compression washer may simply need to be rotated to a spot that has less wear or turned upside down and then tightened. If the compression washer has extensive damage or wear, it may need to be replaced. 

Similar adjustments can also be made to H&R 20 gauge Tamer shotgun shell holders.

Got a little tension?

Staying above the water line!

Riverwalker

Friday, January 13, 2012

DIY Survival Gear Mods - H&R .410 Tamer Shotgun - Tip #3 - Stealth Storage Compartment


Proper cleaning is one of the most important things that needs to be done with any firearm. Unfortunately, you may not want to carry the additional weight of a full cleaning kit. The H&R Tamer has a storage area that allows you to carry a bore snake, an oil wipe and a silicon cloth in order to do an expedient field cleaning of your pack gun. This requires a very simple modification that can be done in minutes and doesn’t require a permanent alteration of your shotgun.

All you need to do is take advantage of the “stealth” storage compartment that already exists on your shotgun. The H&R Tamer’s synthetic stock has a pistol grip which is hollow. This hollow area is sufficiently large enough that you can carry expedient field cleaning items for your shotgun. Should the need arise to do a cleaning before you get back to camp, you can use the items stored in the hollow area of the pistol grip to clean your shotgun.

In order to take advantage of this storage area, you need to do a simple and easy gear mod. All that is needed is a piece of heavy packing foam. If you look closely in the above picture, the piece of heavy foam is readily visible. In this case, a piece of black packing foam was cut to fit the opening in the bottom of the pistol grip.

The foam was cut to make a tight fit and seals off the end well enough that the expedient field cleaning gear won’t fall out. The piece of fairly stiff foam material is also easily removed to access your cleaning gear. The weight of the foam and gear is very insignificant and you won’t even notice it’s there. Cost of this simple gear mod was a couple of minutes of my time and no dollars out of pocket because the foam was obtained free. This type of foam packaging is frequently thrown away by most people. You do need to make sure that the piece of foam used to “plug” the opening is a tight fit.

Got recycled foam for “stealth” storage?

Staying above the water line!

Riverwalker


Sunday, January 1, 2012

DIY Survival Gear Mods - H&R Tamer .410 Shotgun - Tip #2 - Installing Sling Studs


One of the most universal things that can be added to a shotgun or a rifle is a sling that will make it easier to carry. Unfortunately, if your shotgun or rifle didn’t come with studs for a sling, you’ll need to install sling studs before you can add swivels and a sling.

My particular H&R Tamer wasn’t equipped with sling studs and a close examination revealed a little detail that might be missed when installing sling studs on the Tamer’s synthetic stock. If you take the time to examine your H&R Tamer .410 shotgun closely, you will find out about this little detail that makes it fairly simple to install sling studs. This will help make the installation a lot sturdier. 


You will need some sling studs, a drill with drill bit (5/32 “in this case) for the pilot holes and an ice pick to make your starter holes and to install the studs. The ice pick fits easily through the hole of your sling studs and makes screwing them in a lot easier without damaging the stud. Make sure your drill bit is slightly smaller than the threads on your sling stud so you get a snug fit.


It’s fairly simple to install a sling stud on the synthetic buttstock. Even with the hollowed out design which allows for cartridge storage, it’s not very difficult to mount a sling stud. All you have to do is measure in about a half inch from the bottom edge of the rear of the buttstock and drill a pilot hole for the stud. If you go much further in, you risk the threads of the stud going all the way through the bottom edge.


Installing the sling stud on the forend is pretty simple but you need to use the place made for the stud that is incorporated into the synthetic forend. You can even install a sling stud on the forend with it attached to the shotgun but this is probably not the best way. Since the forend removes easily, it’s just as quick to install the sling stud with the forend detached. Just look for the bare spot on the forward part of the forend. This bare area corresponds to a circular area of the inside of the forend that is enhanced for the addition of a sling stud. Both places are pretty easy to spot. Once you’ve located the right place, drill your pilot hole and mount your sling stud.


Once you have the sling studs mounted, all you have to do is reattach your forend and add your favorite sling or make an improvised one.

Got sling studs?

Staying above the water line!

Riverwalker


Friday, December 30, 2011

DIY Survival Gear Mods - H&R Tamer .410 Shotgun - Tip #1


The H&R Tamer .410 shotgun makes a great pack gun. With a simple DIY gear mod, it can be made even more versatile. Although it breaks down easily into two basic components, it does require the removal of a single screw from the forend. To make this an easier task, all you have to do is substitute a ¼” wing nut for the screw on the forend.


Once this is done you won’t need a tool for the removal of the screw on the forend. Cost for this survival gear mod was less than a dollar for a ¼” wing nut. Now my H&R .410 Tamer can be taken down and reassembled without using any tools other than my hand.


Survival is all about keeping things simple.

Got simple survival gear mods?

Staying above the water line!

Riverwalker

Thursday, December 22, 2011

H&R Tamer .410 Shotgun - The Quick Take-Down for Stealth Mode


The H&R Tamer .410 makes a really great pack gun. It breaks down simply and quickly with the removal of only one screw on the forend which can be accomplished with just a simple multi-tool. Survival is all about keeping things simple.


Once the forend has been removed from the barrel, the H&R Tamer .410 shotgun comes apart quickly into two basic parts. Merely press the release lever and unhook the barrel from the front pin on the receiver. The forend acts as a sort of locking mechanism to hold the barrel in place on the front pivot pin of the receiver.


This leaves you with the receiver with the buttstock attached and the barrel. Reattaching the forend to the barrel keeps all the parts together without having to worry about losing the screw that attaches the forend to the barrel. The shotgun can be used quickly by merely re-hooking the barrel on the front pin of the receiver and is still functional even without the forend attached to the barrel.


This reduces the shotgun to two basic components that are relatively short and will fit easily into most regular size backpacks. The H&R Tamer also reassembles in a matter of seconds and quite easily if needed by simply reversing the original process.


Got pack gun for Stealth mode?

Staying above the water line!

Riverwalker

Sunday, December 18, 2011

Riverwalker's Gear Pics - H&R Tamer .410 Shotgun


Snake Charmer

This is a versatile and lightweight shotgun that makes an excellent camp gun. It's a break open (single shot) .410 gauge shotgun that features an automatic shell ejection system. It has a barrel length of 20 inches and an overall length of slightly more than 34 inches. It also has a matte-finish nickel receiver and barrel with a synthetic stock. The synthetic stock also has an integrated shell holder that allows additional rounds to be carried quite easily. It has a full choke with a 3 inch chamber and weighs in at only 6 pounds. The shotgun scabbard shown in the above picture is an optional accessory that wasn't included with the shotgun. 

Got snake charmer?

Staying above the water line!

Riverwalker


Wednesday, December 14, 2011

Preppers, Homesteaders and Survivalists - Gardens, Guns and Gear

Most people are basically gregarious in nature. Our very nature encourages us to want to be around or involved with other people. Labels are simply a way we can identify ourselves with others when we find ourselves struggling with a situation on an individual basis. It is comforting to us when we know that there are others struggling to survive in a similar manner. It is also important when we have encouragement and support from others of a similar mind to help guide us in our struggles.

While there are many paths to reach a destination, we do not always take the same one. This is not a bad thing but is due more to the spark of individualism that can found in all of us. This spark of individualism can grow if it is fed the right fuel into an enthusiasm that can help you reach your goals. The path you take isn’t as important as your intended destination. Although the paths we take may be different, our destination is quite often the same.

Have you ever stopped and asked for directions? Chances are you have done so at some time in your life. Depending upon how many people you have asked for directions, you’ll probably get an equal number of ways to get there. Some ways will be more direct, some will be more confusing and others will leave you wondering why anyone would go in that direction in the first place. You may have even got some really bad directions and found yourself more lost than you were in the beginning. Preppers, homesteaders and survivalists probably have more in common than most of them care to admit. Most all of us seek to solve our problems and reach our goals in our own and quite often unique way. It’s more a matter of the path we take having a different label.

Does it really matter that the road we take is labeled differently? It shouldn’t. There are probably several different ways that you can travel when going to work, the store or to simply  visit a friend or relative. Is one way better than the other? It’s probably not. Are some people going to be more comfortable going in one direction than another? Sure they will. This is especially true if it’s something that may be somewhat more familiar to them or seem less confusing.  The important thing is that you reach your destination and don’t get lost on the way.

Not everyone is going to be a master gardener, a gunsmith or a gear guru. Your first gardening efforts may yield little more than a dead stick in a pot. To some people, a gun may seem little more than a stick with a trigger on it. Others may wonder why someone would need all that gear that’s talked about so much. In truth, all these things have a place and their use is quite often limited only by your experience, your skills and your knowledge.


It’s the experience, skills and knowledge that we have gained as we travel our different paths that will ultimately help us to reach the same destination.

There’s a sign post up ahead...destination... self reliance.

Staying above the water line!

Riverwalker
Related Posts with Thumbnails