Showing posts with label Poultry. Show all posts

Friday, August 9, 2013

Raising Poultry - Using Egg Shells as a Feed Supplement


While there are feed supplements that can be readily purchased from your local feed store, they can increase the cost of raising your chickens. One of the items often lacking in a chicken’s diet is calcium and this can be easily fixed by feeding your chickens crushed egg shells. It is simple to do and can save you a few dollars. It will also solve the problem of eggs with weak shells that break or damage easily.

The first thing you will need to do is thoroughly rinse your egg shells after they've been cracked to remove any remnants of the egg. Once they've been rinsed, allow them to dry in a dish or bowl. Once dried, you can crush them by hand into small pieces and mix in with their grain. This will provide your chickens with the calcium they need to give your eggs strong shells.

Many times people worry about their chickens becoming egg eaters. If your chickens are getting the necessary calcium, this should not be a problem. In fact, a lack of calcium in their diet can actually create this problem with your chickens. Like any animal, they will seek out a source of the nutrients they require.

Chickens also have a natural defense mechanism when it comes to their eggs. They will instinctively protect their eggs from possible predators by eating cracked or damaged eggs in the nest. Cracked or damaged eggs are easily honed in on by predators and could result in the loss of all the eggs in the nest. To avoid this problem, it is a good practice to pick your eggs at least twice a day. This way you will be able to remove any weak or damaged eggs as quickly as possible.

Got egg shells?   
                                                                                                             
Staying above the water line!


Riverwalker                           

Friday, June 28, 2013

The Advantages of Raising Poultry - Hunting Eggs


Empty Nest

One of the advantages of raising poultry is you don’t have to wait until Easter to hunt eggs. When your chickens are allowed to free range in the backyard, they don’t always return to the nest to lay their eggs. More often than not they will find an alternate place to lay their eggs and you will have to do a little hunting to find where they are laying their eggs.

Unfortunately, there isn’t an egg detector available to help you find them. Just keep checking the bushes and you’ll probably come across a stray egg or two.

Got eggs?

Staying above the water line!

Riverwalker

Saturday, April 13, 2013

Mrs. RW’s Cooking Tips - The Hard-Boiled Solution


One of the advantages of having chickens is the availability of fresh yard eggs. Since they are a lot fresher, they have a better flavor but can cause you some difficulty if you happen to like hard-boiled eggs. Here’s a simple solution to that problem which should help you.

Fresh yards eggs that have been hard-boiled can be extremely difficult to peel. You can literally destroy your egg when trying to get their shell off. Quite often you find yourself digging the egg out with a spoon. Thankfully, there are two simple things you can do to simplify the egg peeling process.

First you need to add two or three tablespoons of salt to the water in which you will boil the eggs. This doesn’t make your eggs salty. It just makes them easier to peel. The next thing you need to do is peel the eggs while they are still warm. This should make it easier for you to peel your hard-boiled yard eggs with less difficulty.

Got hard-boiled yard eggs?

Staying above the water line!

Riverwalker

Saturday, March 30, 2013

Computers, Coops and Chicks


Things have been pretty busy this last week. Lots of computer issues that finally got resolved. There was a problem with my ISP for several days but that’s fixed now that the server of my ISP is working properly. Mrs. RW also has quite a few new additions to the flock and is going to need a bigger chicken coop. One more thing on my to do list.


This is also going to be a great project for me to show everyone some tips on building a lightweight but strong coop for your chickens. There was only enough time to build the coop gate today. We have a big family get-together planned for Easter Sunday and there are beans to cook and guns to clean. The plan is to do a little plinking with the twelve gauge. Now it's time to get back to the coop building.


The first tip for building a strong but lightweight chicken coop is to use what I call the sandwich technique. Simply put, you just sandwich your wire between your boards (1X2's). This makes it stronger and there’s less chance of a possum or coon getting in your coop...which it seems we have more than our share of both. The wire is almost impossible for them to pull apart when fastened to your framework in this manner. In this case, I’m using welded wire fabric with the small squares (1/2 inch) to attach to the framework.

I’ll include some later updates as the coop begins to take shape.

Have a Happy Easter!

Staying above the water line!

Riverwalker


Friday, December 28, 2012

Simple Survival Tips - Mrs. RW’s Chicken Repair Tip


It’s a fact of life that chickens don’t always stay in their cage. Unfortunately, when they get out of their cage they may suffer an unpleasant encounter that leads to an injury. Here is Mrs. RW’s chicken repair tip.


Repairing a chicken isn’t too hard if the injury is not too significant and the damage is fairly slight. One of the first things you need to do is separate the injured chicken from the main coop. A small dog cage works well for this purpose. This keeps the other chickens from pecking at the injury and causing further damage which will slow the healing process. They will also need to be brought into a more controlled environment to avoid them stressing out due to temperature changes or other weather-related events.


You also need to make sure they have sufficient food to eat and clean water to drink. You will also need to add vitamins and electrolytes to their diet to help speed the healing process. This usually comes in a water-soluble powder that can be mixed into their drinking water. A small bottle of this powder goes a long way and the electrolytes can be used to help speed up the healing process of your injured chicken.

Got chicken repair?

Staying above the water line!

Riverwalker

Tuesday, November 20, 2012

DIY Homesteading Project - PVC Pipe Chicken Coop


If you are looking for an inexpensive alternative to house your chickens, a PVC pipe chicken coop may be the solution. The size of your coop can be easily expanded to accommodate new additions to your flock. It can also be kept to a minimum if there are urban restrictions on the size of your flock. The PVC pipe chicken coop gives you an alternative that is lightweight, easy to assemble or disassemble and provides an inexpensive alternative to using a wooden structure. 


PVC pipe works great for a support structure but experience has shown that you will need at least a 1 1/2 inch size pipe for the creation of a sturdier structure for you to attach your chicken wire. A 2 inch PVC pipe would make it even sturdier but will add some to the cost.


The larger size PVC pipe also makes it easier to attach hinges to your gate for easy access. The size of the opening can be varied quite easily and will mainly be determined according to your individual needs.


The PVC pipe can be glued for a more permanent type of structure or you can drill small holes and join the sections with screws. The latter method will allow easy disassembly and reassembly if it becomes necessary to move your structure. Even a large PVC coop can be moved quite easily if necessary.


Corrugated plastic panels can provide a sheltered area for your chickens or you can opt for a more natural approach and allow vines to grow over your PVC coop. A PVC coop allows you a very affordable alternative in any case. PVC pipe is also easy to work with and requires a minimum skill level in order to build a decent structure.

Got PVC coop?

Staying above the water line!

Riverwalker

Monday, April 9, 2012

Riverwalker's Pics - Buckets of Chicken


Buckets of Chicken

The little ladies have taken nicely to their coop renovations. The clear winner is bucket #1. 

It seems to be the favorite and is clearly the bucket of choice.

Got poultry?

Staying above the water line!

Riverwalker

Thursday, April 5, 2012

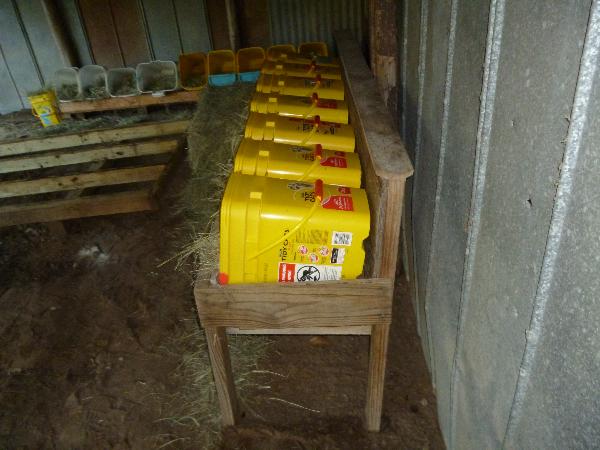
Homesteading Project - DIY Chicken Nesting Boxes Using Kitty Litter Buckets


Front View of Nesting Buckets

RW, Jr. and Medicine Man spent some time yesterday finishing up their DIY nesting boxes for the main chicken coop. Some extensive repairs were made on the main coop and some additional coop space was added. In the above picture, you can see the buckets with fresh hay ready for the little ladies. The raised nesting boxes will make it easier to harvest the eggs once someone has seen and made the birth announcements that the Hen's have laid the eggs. Saving time with harvesting eggs means more time for other chores and even a good egg breakfast.


Side View of Raised Nesting Buckets

Here's a side view that shows how the buckets fit in the raised portion of the holder for the new nesting buckets. RW, Jr. and myself put this together using some scrap lumber. The buckets fit easily into the raised platform. There are some additional ground nesting buckets visible in the background.


View of Bucket with Partial Lid

A small section of the lid was left on the nesting buckets to help hold in the nesting material. The lids cut easily with a knife and the partial lids really help in retaining the nesting material.


Kitty Litter Bucket

Since the regular round buckets aren't always available in sufficient quantities, it was decided to use empty kitty litter buckets to make the nesting boxes. There was no shortage of kitty litter buckets available thanks to the Cat Lady.


Raised Ground Nesting Buckets

RW, Jr. also made a small raised platform about 4 inches high for the ground nesting buckets. These are for those hens that feel more comfortable at ground level. With no shortage of kitty litter buckets, there'll be plenty of nests for the hens.

It is always important to utilize all your resources. Usually a simple solution to your needs can be found quite easily if you spend a little time looking in the right place. 

Got DIY nesting buckets?

Staying above the water line!

Riverwalker


Thursday, March 10, 2011

Chickens Don't Sweat


Chickens don’t sweat. When chickens get overheated, they pant. This innocent little fact can lead to a serious loss off egg production from your chickens, especially during hot Texas summers. In hot weather, chickens quite often lay eggs that have very thin shells which are easily broken.  This can happen very frequently and often have disastrous effects on the amount of usable eggs you will get from your chickens. This is a consequence of a disturbance in their systems caused by a loss of calcium carbonate from their systems.

So what causes that loss? When a chicken pants, they are rapidly exhaling carbon dioxide and this seriously affects their bodies. This usually causes a loss of calcium carbonate in their systems which ultimately results in thinner and weaker egg shells. This is not a good thing!

There is a relatively simple solution to this problem. It's cost effective and quite simply accomplished. All you need to do to solve this problem is to make some carbonated water available for them to drink during periods of hotter temperatures. The addition of carbonated water helps reduce the loss of calcium carbonate by their bodies and will help to keep their eggshells stronger. This will help to maintain their egg production during hotter temperatures. This quite simply means you will get better and stronger eggs.

This is due to Chatelier's Principle which can be stated in more general terms as:

“Any change in the status quo prompts an opposing reaction in the responding system.”


Staying above the water line!

Riverwalker

Tuesday, November 17, 2009

Raising Poultry - Ground Nesting Boxes


Well it seems like RW, Jr.'s chickens have a mind of their own. Despite his best efforts to provide them with some decent nesting boxes, there are quite a few who simply won't use them and prefer to lay their eggs at ground level. Personally, I think it has something to do with gravity or a fear of heights as far as the chickens are concerned.

Sometimes you have to go with the flow. To avoid having to hunt down the eggs in various hidden places these "picky" layers have been using, he's set up some ground nesting boxes (OK, they're actually old plastic dishpans) and it seems that they have become quite popular and are used by multiple chickens to lay their eggs in a majority of time. Less hunting and more gathering! RW, Jr. is almost as smart as his dad. LOL

The picture above shows the dishpans full of eggs. Mrs. RW and I went out to gather the eggs because RW, Jr. was working late. We also needed to take some eggs out to Little "G" and the Plant Lady out at the farm. I spent most of my time working on roof repairs to fix a leak while out there. Thanks to CK and some excellent guest posts on Security Landscaping I was able to sneak away from the computer long enough to catch up on some much needed repairs.

Some more good news was rec'd when the Plant Lady told me she had several small cactus trees like I previously posted about ready for me whenever I wanted them. She also said they have real pretty purple blooms (might be a little more appealing to the little ladies out there when you guys are trying to convince your wife you need a few cactus trees). Adding a little more security and doing it for free is great!

Just hope the chickens decide they don't want to make a nest in the cactus or somebody else will have to gather them!

Staying above the water line!

Riverwalker


Friday, August 28, 2009

Raising Poultry - The Benefits


Raising your own poultry does take a good deal of work but with a little persistance you can reap the benefits for you and your family. Yes, they have to be fed and watered and you need a coop to keep them in and a nesting box or two or three stuffed with some fresh hay. But afterwards, you will have one of the most reliable resources for a number of needed items. Raising poultry is a good start to being self reliant.


You will soon start to have plenty of eggs to eat which are also a good source of protein. There will be chicken manure that can be used as a fertilizer and fresh meat available for the pot or frying pan. Raising chickens is a winning proposition. You may even get in a little target practice on any critters trying to get at your chickens if you live in the country.

Got brown eggs?

Staying above the water line!

Riverwalker


Thursday, July 9, 2009

Prepping Projects - Temporary Chicken Coop


The chicks have grown up fast and are now chickens. They've gotten quite big and needed a lot more room than the small cage they were originally kept in at first. RW, Jr. came up with the idea of using a portable carport canopy, something like a 12x20, as a chicken coop until we could get some free time to build a more permanent structure. With both of us working regular jobs and part-time jobs as well, finding extra time for our prepping projects can be difficult. It's been working really good so far and the chickens seem to like the additional space to move around while they are scratching for bugs.

RW, Jr. bought the portable carport canopy on sale and used some heavier duty hardware cloth to seal up the sides because the varmints around here have a tendency to tear through regular chicken wire pretty quick. He also put down some old pieces of lattice work down around the edges to discourage predators from digging under the edges of the temporary chicken coop. A few solar lights were also added to make it easier to see around the coop at night. The canopy also gives them a lot more shade to protect them from the heat of the sun.

Got coop?

Staying above the water line!

Riverwalker

Thursday, May 7, 2009

Raising Poultry - DIY Bulk Feeder


A small DIY poultry feeder works great for a small number of chickens or when they are just chicks. However, baby chicks become big chickens and also develop a big appetite. If you have a larger flock of chickens, you will need a bulk feeder to take care of that appetite. It will also free you from having to put out feed everyday and avoid making this a time consuming chore. Here’s a simple cardboard bulk feeder that you can make out of a cardboard box until you get around to building a more permanent one out of wood.

Most good carpenters don’t like to cut a board unless they have a definite layout to go by. There is an old saying about measuring twice and cutting once that I try to follow. One wrong cut can ruin a big piece of lumber. Lumber is way too expensive to waste. Many modelers make cardboard prototypes first and wooden models are made from these after the design is shown to be feasible. It’s important to know that it will accomplish the job for which it was designed.


This is kind of a disposable bulk feeder. Since it is made out of cardboard, I’m not exactly sure how long it will last. Hopefully, it will last long enough to get the wooden one built. It will need to be set on a board to protect it from moisture condensation but should last several days. If not, I can throw another one together in about 30 minutes using another cardboard box.


Front view of Bulk Feeder


Here’s the how to:

First thing you will need is two (2) boxes the same size, a couple of small dowel pins, a ruler or tape measure, and a box cutter or utility knife. I used a sheetrock knife on this one because it was handy and I didn’t want to dull the blade on my pocket knife. If you want to dull a blade, just cut a little cardboard and you will find out quick. In this case, my boxes were 18 inches wide, 18 inches long and 16 inches high. I got these boxes free at my place of work. Your boxes may be different sizes but the principle is the same.


Side View of Bulk Feeder


Next I measured two (2) inches up from the bottom on one side of the box and marked and cut a straight line across the front on one side. This is the feed tray opening. Then I cut up each side of the box 7 inches and folded the cut part inwards. This creates the feed gauge plate. I then held the flap at about a 45 degree angle and marked two holes on the side of the box for a wooden dowel pin (small). The dowel pin holds the feed gauge in an open position.


Inside View


Next I cut one side out of the second box and inserted it at an angle inside the first box. This made the feed plate. I placed a wooden stop (piece of inside corner molding) approximately 5 inches from the front edge of the box to keep it from sliding forward and to hold it in place. I then placed a hold down bar (large dowel pin) at the top of the feed plate to lock it in place. The dowel pins are different sizes for illustrative purposes.


Front View with Feed
Inside View with Feed


I then placed some dry dog food (all the chicken feed is out at the farm) in the finished bulk feeder and it worked like a charm. I will be building a more permanent bulk feeder out of wood and will post the results and the building plans for everyone as soon as it’s done. I’m hoping to make the design where it can be built from a single sheet of plywood, a couple of hinges and some sort of locking mechanism to keep pests out.
A chicken feeder for "chicken feed".


Got cardboard?

Staying above the water line!

Riverwalker

Tuesday, April 21, 2009

Raising Poultry - DIY Poultry Feeder


Raising poultry can be fun and inexpensive if you learn to make some simple equipment. Buying ready-made poultry equipment can be expensive when raising chickens on a small scale. Here is a way to make a simple and effective feeder for your chickens that can be made very easily and at little or no cost.


Items Needed:

1 Coffee can (size #10) with lid

1 Metal pie pan (make sure the circumference is larger than the coffee can)

1 Piece of baling wire (10 to 12 inches in length)

2 Small washers

1 Small bolt with nut (1/2 to ¾ inches in length)


Tools Needed:

1 Hammer

1 Large Nail (used to make holes for wire handle and bottom bolt)

1 Can opener (“church key”) - used to make exit holes for feed

Instructions:

Use the can opener to make four or more holes at the bottom of the coffee can. Then place the metal pie pan on bottom of coffee can and use the hammer and nail to punch a hole through the center of the metal pie pan and coffee can at same time. Be careful to keep it centered. Bolt pie pan to the bottom of coffee can. Using the hammer and nail; punch two holes on opposite sides of coffee can near the top. Thread end of wire into holes and tie around washers. This keeps the wire from pulling out. Fill with chicken feed and cover coffee can with plastic lid that comes with the coffee can. Set out for chickens to enjoy or use the wire holder to hang in the coop.


You can also use old Frisbees or plastic plant plates to make these coffee can feeders. The disposable type pie pans can also be used but don’t hold up as well over a long period of time. My addiction to coffee also gives me a ready supply of coffee cans. The metal pie pans can usually be found at garage or yard sales for 25 cents or less.

CAUTION: DO NOT USE THE WIFE’S GOOD PIE PANS FOR THIS PROJECT!

Staying above the water line!


Riverwalker

Monday, April 6, 2009

Raising Poultry - DIY Nest Boxes


Trying to raise chickens on a very tight budget can get expensive if you always have to go out and buy the necessary equipment. If you are a do-it-yourself chicken farmer, there are plenty of places where you can buy different types of poultry equipment. You can save a lot of money by just re-cycling everyday household items. One of the easiest things you can make is nesting boxes.

Building a nesting box is not a requirement but it sure makes it easier to collect eggs from your hens that are laying. This will save you from having to hunt for eggs and will allow you to gather them in one specific location. No need for egg hunting, all you do is go gather your eggs from your nesting boxes. Of course you will always have one or two hens of an “independent” nature that will decide to go off somewhere on their own and lay their eggs. You’ll just need to keep an eye out for them. Most hens if given a good nesting box will use it on a regular basis and continue to do so the majority of the time.


One of the quickest and easiest ways to make a nesting box for your chickens is by using old five gallon plastic buckets. Even if your bucket has lost its handle or got a crack or small hole in it, they can still be used to make a simple nesting box. By laying the bucket on its side and giving it a little additional support on the bottom, they make excellent nesting boxes. We use old plastic buckets all the time and they work great. Another good thing about the plastic buckets is they also offer some additional insulation value for the nests and they aren’t affected if you happen to get a small leak in the roof.

Just add a little nesting material to the bucket and you’ve got a great nesting box. We also use old golf balls in the nests as fake eggs. Use your imagination and get creative before you go out and spend a lot of money on fancy equipment you can get by without if you just give it some thought. You can also use old milk crates, plastic bins and storage containers, old plastic trash cans or whatever you may have lying around.

So don’t throw your old cracked and broken buckets away when you can make a nesting box for your chickens!

Check out Bitmap’s pics of chickens and other stuff.

Staying above the water line!

Riverwalker

Sunday, March 29, 2009

Raising Poultry - Update

Fresh eggs aren't far behind!
Staying above the water line!
Riverwalker

Thursday, October 16, 2008

Preppin' Tips - Protecting Poultry

One of the easiest ways you can help to keep your chickens healthy is to take a shallow box or pan and place a mixture of sand and wood ashes in it. Make sure you use the kind of ashes you get from a fireplace or wood stove. Place the box of ashes where your chickens will have easy access to it. This effectively makes a “dust bath” for your chickens and will help to eliminate external parasites on your chickens.

If the box of sand and wood ash mixtures becomes damp or contaminated (by fecal matter, etc.), simply dump out the contents and replace with a fresh sand and wood ash mixture. Make sure you DO NOT use charcoal briquette ashes as these may contain toxic chemicals that could be harmful to your chickens.

More tips on raising and keeping chickens can be found here:

http://www.fao.org/docrep/T0690E/t0690e08.htm#TopOfPage

This is an excellent way to make use of your wood ashes from a Wood Stove or fireplace.

Staying above the water line!

Riverwalker
Related Posts with Thumbnails